Pages

Friday, November 25, 2022

Starting on the Front Porch

Hi Friends,

I hope you had a very nice Thanksgiving!

Today was a little bit of cleaning 

and taking down the Christmas boxes.

I try my best to stay home

 on Black Friday just to get caught up !

I didn't get much done,

it was a beautiful day and I wanted to be outside.

The weather was wonderful and warm.


I cleared the leaves and cobwebs from the front porch.

I put up the wreaths on the front door to start.

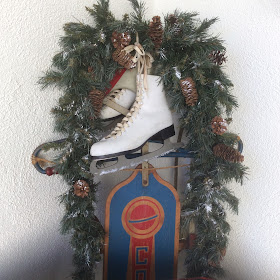
Then found my old ice skates I like to hang

on an old sled.


I wanted to give them the look of snow-

Yes, it's 80 degrees here....

I know it's never going to happen.

I had some fake snow and glitter on hand- I went for the 

fake snow.


I just ran a line of glue on the blade.


Then added the snow.


I liked the look!

If you love glitter you could 

add a design or snowflake on the heel.


I looped the skates over the top of the sled.


I put the sled up against the wall.

Then added a garland, pinecones and a bit of white paint.


That was a good start.


Tomorrow we are having company

and I wanted the porch to look festive.


My family says No Christmas before Thanksgiving !

It was hard to wait :)

xo Lisa S

Wednesday, November 23, 2022

Best Thanksgiving Wishes to you !


Hello My Friends,

I'm sharing another sweet postcard from artist Ellen Clapsaddle.

I love the fall colors in this card-

Feel free to save and share.


You mean so much to me!

I hope you have a wonderful Thanksgiving.
xo Lisa S


Monday, November 14, 2022

Snowman in the Nut Chopper ?


Hello Friends!

Last week was the last Flea Market for the year for us.

Time to get busy with other things....

This NUT CHOPPER was left over from our sale and I just decide

to give it another chance and repurpose it.

Now it's a Christmas item !


I had some 1/4''packing foam to use at the base of the jar.


It was easy to cut with scissors.


I had some bleached trees in my stash.


They just needed a dab of white paint


and some glitter.


When the lid was on tight, I put a piece of 


tape on the jar to mark the front.


I glued my homemade clay snowman in place.

Then added the trees.


Covered the foam base with loose glitter.


I cut a piece of foam to cover the blade and to 

keep anything from falling inside.


Then my Husband said- Too bad you can't put lights inside!


Well, I took out the foam and looked around for a tea light.


I was surprised it fit perfect!


I turned the tea light upside down

with the switch up.


I put the small piece of foam packing


back on to cover the top.


It can easily be pinched out to


 expose the on and off switch.


The small tea light puts off a lot of light.


And the handle can still turn- I liked that


Just for fun!


I have one last Craft Show this weekend,

I will be taking the nut chopper with me.

Update: This little cutie SOLD


Have a blessed day! 

xo Lisa S


Tuesday, November 8, 2022

A New Daily Planner Cover from an Old Book


Hi my friends,

I have been turning old books into all sorts of things for years.

I never get tired of the surprised faces when

someone looks inside.


It's fun to match a book to someone's own special likes or hobbies.

It can be a great personal gift.

It's one of those 'crafty' items I like to sell at the

Flea Market and Craft Shows.

This version is the easiest of all !

To start you will need a soft cover Calendar or Day Planner.

I like to get mine at the Dollar Tree.

The size that I used was 7'' by 5''


I remove the plastic cover and this time I also removed

the cardboard cover.


You also need-

An old book approximately 7'' by 5'' with a 3/4'' wide spine.


This book was only .25- at my public library

The cover was great but some one named Miss Kimberly Ann Donovan

wanted to share her love of the color red with the world.


And pages were falling out-


You will need-

A piece of round elastic double the height of the book,

about 15 ''


You will need-

Glue


And you will need-

Scrap paper to cover inside,


To start-

I removed the pages carefully.

I saved the lining pages.


I was able to use the lining page to cover the spine

and make a pocket.


I cut the elastic and tied a center knot.


Open the Planner and find the middle.

These planners were stapled in the center-

Just slide through the band.


That's just how easy it is !


The back cover has a pocket.


I had enough of the lining paper left over to make a book mark.


Top view-


I cut small v- shapes at top and bottom center spine
to keep the band centered.


The other planner I was working on was this book,

Toward Pleasant Shores....what a lovely thought !


It had water damage on the inside.


I was able to repair the spine with paper tape


Going with the adventure theme, I covered the inside

with a page from an old Atlas.

Added the elastic band and slipped the calendar inside.


The knot is at the center.


Finding a replacement planner

 for the following year should be easy-

just slip the old one out and the new one in.

I plan to give the one below as a gift.

I tied a piece of old seam binding around the middle.


 This version here is a bit more complicated.

You can see how I made pockets to slide the calendar inside.


This version here was stitched into the spine of the book.


The easiest way-

Update: Sold


I hope you enjoyed this idea and are inspired

to make one for a gift or for yourself.


Thank you so much for visiting!

XO Lisa S