Hi Friends,
I am already started to think about FALL!
It has been a very hot summer.
I know the Faux Caramel Apples have been around for years,
but I make mine a bit different.
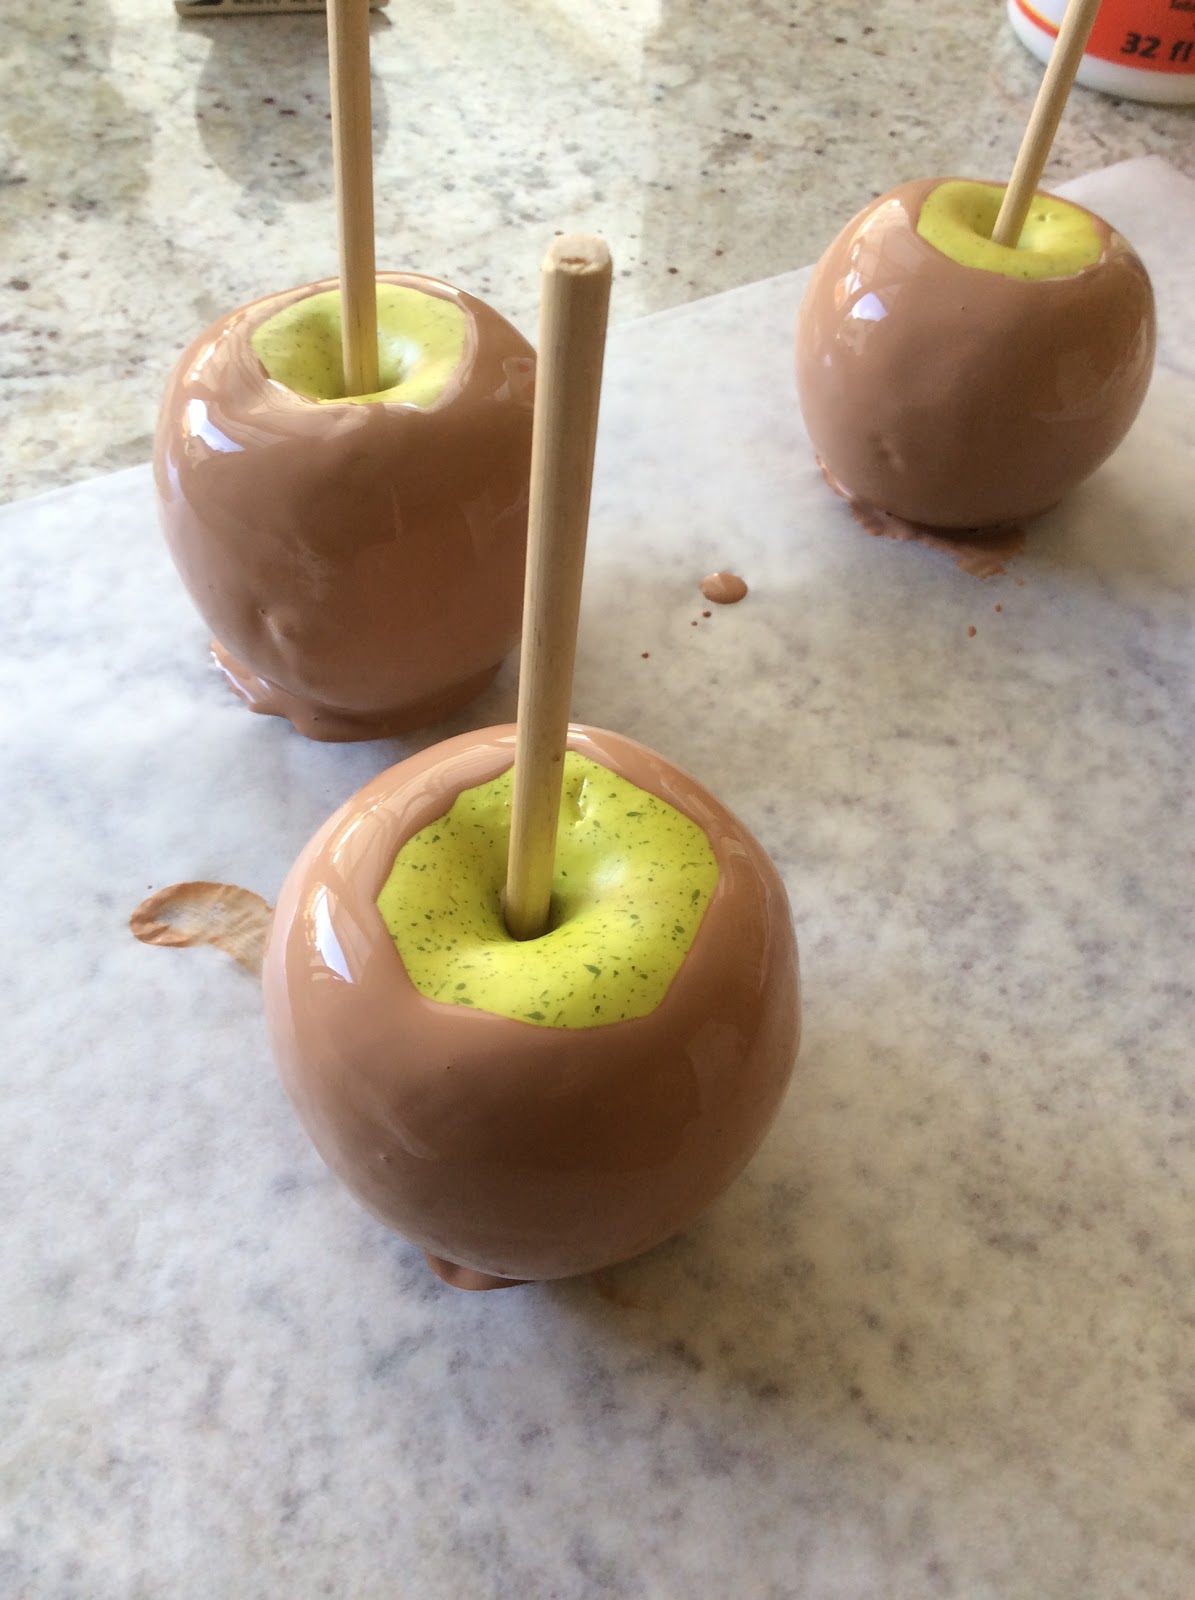
To start I use the green apples from DOLLAR TREE.
I like odd numbers when decorating so I bought 3.

Pull out the stems and remove the tags.

For the sticks you can use, popsicle sticks, twigs from the garden,
paper lollypop sticks or thin dowels.
I had 3, 6'' long dowels on hand so I used those.

I pushed the sticks into the Styrofoam apples until only 4'' of dowel was showing.
I used Tacky glue to hold the stick in place.
Cover your work area with waxed paper.

You will need Glossy MOD PODGE- not the matte.
About 1/2 cup was plenty for 3 apples.
You will also need Acrylic paint to tint the Mod Podge.
My paint was .59 from Joanns' Fabric in the color.... CARAMEL !
I used about 1/2 a bottle or 1 ounce.
Note: The color will darken a bit as it dries!

I used a disposable plastic bowl and plastic spoon to mix.
At this point you start to say...yum...
At this point you start to say...yum...

The next step needs two hands...so no pics !
Holding the stick in one hand, and the spoon in the other- spoon your ''caramel '' over
the apple at an angle over the bowl and let it drip downward.
Continue all the way round the apple - slowly.
The consistency is not as thick as real caramel.
The spoon works so much better than a paint brush!
I like a little apple to show on top and puddle at the bottom-
you may prefer to have more apple show at the bottom.
Try not to touch, set on wax paper and leave alone for now.
If you see any tiny bubbles you can pop them with a toothpick!
After about an hour I was ready to add the ''nuts''.
All of the apples I see others make use corn cob small animal bedding?????
There was no way I was going to buy a huge bag for just the tiny bit I needed-
You all know I'm cheap!
So I use....Steel Cut Oats...I think it looks even more like chopped peanuts than the corn cobs.
Put some oats on a plate.
Pick up your apple by the stick and set in the oats.
The Mod Podge is still sticky enough to hold the oats.
Tilt apple and sprinkle near the base with your free hand.
Tilt apple and sprinkle near the base with your free hand.

Set back down on a clean piece of waxed paper.

Leave alone for another hour.

Come back to check on your apples, as they dry they look less opaque and more shiny!
When dry, you can set each apple in a cupcake liner.
You can change the liner to match any holiday!
See the color change?

A side view of the apples with vintage Trick or Treat Candy bags.

These apples could fool anyone.


Perfect for Fall staging!


I added some raffia bows and put them on a tier tray that I made
using a vintage rolling pin, cut and a pie tin and pizza pan.

Make sure your family knows these are just for decoration......
They are making my hungry-

If you don't want to make your own, here's a link to get 4 of my apples
already made, each in a cellophane bag for $12
https://www.ebay.com/itm/363105393005
Okay my question for you....
Do you like your Caramel Apples with or without nuts?
Thanks for visiting!
xo Lisa S


What a fantastic project! Great results and very nice tutorial!
ReplyDeleteKathy
DeleteThank you so much. They are fun and easy to make.... and they look too real! Let me know if you make some.
xo Lisa S
This is the most amazing craft I have seen is a long time. I am going to try to make them. Thanks!
ReplyDeleteLady Pamela,
DeleteWhat a sweet comment! Please let me know if you make them.
Thanks for visiting- xo Lisa S
Hi Lisa, I am so ready for fall, too, this is such a great idea, thank you for sharing.
ReplyDeleteBlessings,
Sue
Hi Sue,
DeleteFall is too short of a season right?
Thank you for visiting- xo Lisa S
Thanks so much for linking up at the #UnlimitedMonthlyLinkParty 3! Shared.
ReplyDeleteDee
DeleteThank you for hosting and stopping by-
xo Lisa S
No way! This is awesome. Completely adorable.
ReplyDelete#unlimitedmonthlylinkparty
Hi Jennifer
DeleteThank you! They are making me hungry...and my family is continuing to say make some real ones now ;)
xo Lisa S
What an awesome idea. I am going to try this for sure. TFS with #omhgww
ReplyDeleteClearissa, It is so easy! I 'm sure you will be pleased with the results. Thank you for the kind comment so glad you stopped by!
Deletexo Lisa S
What a cute idea and they looks so realistic! Thanks for sharing at Vintage Charm--pinned!
ReplyDeleteCecelia
DeleteThey were so fun to make.Thank you for the pin.
xo Lisa S
This is so clever, Lisa, and they look so real! Thank you for sharing at Party In Your PJ's, you are being featured on my blog tomorrow night.
ReplyDeleteThank you Ann!
DeleteI'll be there-
xo Lisa S
wonderful presentation and plating. Looks so yumm and followable. Thanks for joining us in Bloggers Pit Stop - Pit Stop Crew
ReplyDeleteMenaka
DeleteThank you so much for the kind words.
Sorry to fool you :)
xo Lisa S
I saw this on one of the link parties and was called to check it out. I couldn't imagine what you did to make then faux but you certainly did not disappoint.
ReplyDeleteDr. Elise
DeleteYour sweet comment made my day.
xo Lisa S
What a fun project for fall and I am going to get started on mine this weekend! I just love your special projects. Thanks so much for sharing with us at Full Plate Thursday,444 and hope you have a great week!
ReplyDeleteMiz Helen
Thank you Miz Helen
DeleteLet me know how they turn out.
xo Lisa S
Congratulations, Lisa! Your post will be featured this week at the Weekend Blog Hop at My Flagstaff Home! Stop by to see it! --Jennifer
ReplyDeleteJennifer
DeleteYou are the sweetest! Thank you so much- see you there!
xo Lisa S
How cute is this idea for Fall decorating. I'd need to keep them up high so my 4 year old grandson didn't attempt to eat it.
ReplyDeleteMarie
DeleteThank you for the kind comment! My Dad didn't believe they were fake and he kept touching them!
xo Lisa S
I thought those were real until I actually read the post! Great job!
ReplyDeleteThank you for sharing at The Really Crafty Link Party. Pinned.
Teresa
DeleteThey look real up close too!
xo Lisa S
LOVE these! So clever, and fun for decorating.
ReplyDeleteI have chosen these are one of my features at this week's Snickerdoodle Create Bake Make Link Party, which goes live tomorrow (Saturday) at 5pm EST.
Alexandra
EyeLoveKnots.com
Alexandra
DeleteThank you so much!
I will see you there-
xo Lisa S
Lisa,
ReplyDeleteJust when I think you can't get any more creative, you do. I can't believe they are not real. Congrats, you are being featured at Happiness Is Homemade.
https://eclecticredbarn.blogspot.com/2019/08/happiness-is-homemade_17.html
Hugs,
Bev
Bev
DeleteYou are so kind!
I am so grateful to you- you bless my little heart!
Thank you for hosting and featuring my apples.
xo Lisa S
these are awesome! you are one creative lady! Now I am going to have to try this out!
ReplyDeleteKelly
DeleteThank you! It's easy and I know you will be pleased with the results.
xo Lisa S
How absolutely darling! Thank you for sharing it. It makes a perfect Fall and Halloween decoration. I love how you used it in your vintage vignette. It looks so real! I imagine I could change out the caramel color for red and make red candy apples too for those who are fond of them? So much fun..
ReplyDeleteThank you! One warning- It makes you so hungry!
DeleteLet me know how the candy apples turn out.
xo Lisa S
These TOTALLY fooled me, Lisa! At Tuesday Turn About, I saw the preview and was like, "Faux Caramel Apples... What?" Thanks for sharing!
ReplyDeleteThank you Julie!
DeleteThey look so real close up too-
xo Lisa S
These look so pretty, and so realistic, Lisa! What a great fall decoration! Thank you for sharing with the Hearth and Soul Link Party.
ReplyDeleteApril
DeleteThank you! I am having a lot of fun with them.
xo Lisa S
Fantastic, and so REAL looking! Pinned!
ReplyDeleteRita
DeleteThank you so much. I appreciate the pin.
They look so real and the 'nuts' help. They are standing up to a whole lot of touching too!
xo Lisa S
Thanks for sharing this at Tuesday Turn About, Lisa! Your faux caramel apples really fooled me! I chose your post as one of my features on the blog. I hope you'll stop by again to join the party.
ReplyDeleteThanks Crissy!
DeleteYou made my day-
xo Lisa S
such a cute idea, they look so real!
ReplyDeleteThank you Debra!
DeleteThey even feel real when you touch them....somebody's going to bite it I'm sure.
xo Lisa S
Congrats! Your post is FEATURED at the #UnlimitedMonthlyLinkParty 4. Party open now!
ReplyDeleteDee
DeleteThank you so much. You made my day!
xo Lisa S
What a fun idea!! Thanks for sharing at My Big Fat Menopausal Life's Share the Wealth Party! Hope to see you at the new one the end of this week.
ReplyDeletethank you so much!
Deletexo Lisa S
These came out amazing!! What a fabulous idea. Pinned.
ReplyDeleteJoanne,
DeleteThanks for your comment! I appreciate the pin :)
xo Lisa S
This is a great project! I have never seen this before but they look awesome and really are a great idea. Thanks for linking up the post this week. #HomeMattersParty
ReplyDeleteDonna,
DeleteThey really look real in person. Thank you!
xo Lisa S
What a fun idea!!!!! I have never seen this before!
ReplyDeleteRebecca
DeleteIt's nice to meet you!
Thank you for your comment.
They look so real. I have a thing for fake food :)
xo Lisa S
They look fantastic Lisa... what a great DIY project!
ReplyDeleteThank you for sharing this project at Create, Bake, Grow & Gather this week. I'm delighted to be featuring your faux caramel apples at the party tonight and pinning too.
Hugs,
Kerryanne
Thanks Kerryanne!
DeleteYou are wonderful- I'll stop by.
xo Lisa S
OMG you had me so fooled! These turned out great and featuring when my party opens.
ReplyDeleteThank you Carol!
DeleteI will stop by the party.
xo Lisa S
Wow, Lisa - these look so realistic! Such a fun idea. Thanks for sharing, Suzanne.
ReplyDeleteVery clever especially the nutty steel cut oats.
ReplyDeleteKris
DeleteThank you so much. I wanted to use something that looked realistic and safe around kids and animals.
xo Lisa S