Monday, February 28, 2022

Thrifted Frame with Spoon Nest


Hi Friends,

This project was so simple it really doesn't

need any directions.


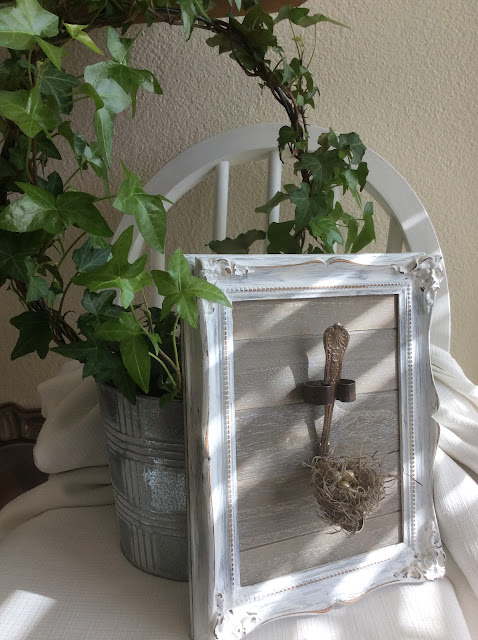
I  found this ornate wood frame and went ahead

and  used chalk paint to cover the gold.


Wiped off some areas with a damp cloth.


I had an idea but I wasn't sure it would work-

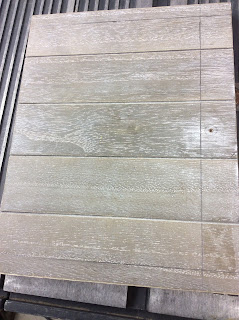
I bought this scrap or flooring for .25

I liked the grey color so I left it as is-


It was bigger than the frame and I was

hoping it could be cut to size.

My husband was happy to help!

I have a collection of metal odds and ends.

I found this old broom clip and

attached it to my board.


I had one spoon left from my jewelry making stash.

I thought it was interesting, It has an anchor insignia

from the U.S. Navy.


It was fairly easy to bend.

I wanted it to hold a nest.


I added a picture hook


I used wood glue to hold the 'flooring' in place.

It was nice and thick so the back is flush with the frame!


I pinched it with clips until dry.


To make the nest, I pinched together a bit of moss.

I strung 3 old pearls on a wire and twisted the end and left a long end

to wrap around the base of the spoon.


I used silver wire so it would not be seen.


The spoon sits easily in the clip.


The spoon can be changed if I like.

 I may decide

to add a small bottle later-


I hope you have a blessed day!

xo Lisa S


Monday, February 21, 2022

Baking Tips for Vintage Pyrex- Apple Crisp Recipe

 Hi Friends!

How are you ?

I rarely share a recipe, but my newly thrifted Pyrex

reminds me of SPRING!

The pattern is called SPRING BLOSSOM

sometimes called Crazy Daisy.

Made in 1970.

The rectangular piece is a refrigerator dish, it was 

originally in a set wit smaller pieces that match.


I had some apples sitting around-

Let's bake with it!


Apple Crisp

4 c. sliced tart apples ( about 4 to 6 )

2/3 c. packed brown sugar

1/2 c. all purpose flour

1/2 c. rolled oats

1 tsp. ground cinnamon

1/3 c. butter, softened


Preheat oven to 375 degrees.

Arrange apples in a greased pan,

approx. 8" x 8"

 (My pan is 6 x 8 )


Mix all other ingredients, 


sprinkle over apples.


Do you know why ' Cinderella mixing bowls

 have the funny handles?

They are for pouring.

The small side is for liquid, the larger side for batter.


Bake 30 min, or until golden and apples are tender .


Serve warm with ice cream!

Serves 4 to 6


So convenient to have it's own lid for storing.


Never use harsh cleaners on the exterior.

Always hand wash.

If you find some vintage Pyrex that has lost it's sheen but still has color-

Try this amazing trick !

A little bit of MINERAL OIL and a soft cloth works like a charm.

No need to scrub, be gentle, a little goes a long way.

 Mineral oil is safe around food.


The left side is  dull and see on the right side the color

is really enhanced.

Let me know if you used this tip!

Mineral oil is great in the kitchen.

I shared this post about caring for wood here


Now you can display your Pyrex !


xo, Lisa S


Monday, February 14, 2022

Repurposing Vintage Books into Boxes


 Hello friends,

I love old books! 

Sometimes I bring them home even though

the books are pretty damaged.

Maybe the cover is good but the pages are bad-

or the pages are good and the cover is bad!

My husband knows that sometimes I just like the title!

He found this book and he know I would love the title-

but the book had a lot of water damage but the cover was okay.


Perfect for this project.

I wanted to turn my book into a keepsake box.

I also wanted the box to still look like a book.


Removing the pages was easy- 

they just about fell out on their own!


I used one of the pages to cover the inside spine.


Then made sure to fold on the crease lines. 


I covered the interior of the book 

with a piece of scrapbook card stock.

I use 3 in 1 glue.

You could also use Mod Podge.


Refold at the natural book creases-


To make the box frame, I measured along the edges of

back cover.  I used 1'' wide wood strips, some were old paint stir sticks.

You could use scraps of molding.


I used wood glue to make the frame.


Then I covered the inside edge with paper.


Then the frame was glued to the back cover.


I had another larger book that was also damaged.


Remove the cover by cutting the pages out

with a utility knife.


Careful not to cut through to the cover.


I covered the inside spine with one of the removed pages.


I glued the framed pieces together.


Then covered the inside cover and frame with paper.


I thought the unfinished wood looked just like paper pages.


The smaller book was just the right size to hold a checkbook.


I loved making these boxes!

Thank you for visiting today-

xo Lisa S


Faux Tin Tile Bunny

Hello My Friends!  Most of the Craft and Dollar Stores have some chunky cut outs for Spring! There are so many ways to decorate these. I use...