Friday, September 21, 2018

NO-SEW Pumpkins


Here is my version of a NO-SEW Pumpkin.
 
 
I like to recycle long sleeve shirts and pants.
 
 
First cut off the sleeves at the shoulders, then remove the cuff portion.
 
Cut the legs off at zipper and save. We won't need the seat of the pants or
 
the body portion of shirt. You can discard or put aside for another project.
 
 
Cut into lengths between 6'' to 12 ''


The  sleeves and the pant legs are tube shaped, turn inside out.


You will need some Jute and a Hot Glue Gun


 Gather by hand and tie off with a short piece of Jute.
 
Pull tight.
 
Note: I would not use a rubber band because over time a band will
 
wear out and break
 
Turn right sides out.
 
 
This is the bottom of your PUMPKIN 


Stuff with Polyester Fiberfil


This is the underside
 
 
Tie off top, leaving a tail for optional tendril.
 
If you don't want the tendril just cover with Jute.
 
Do not cut off the roll of Jute, you will be wrapping the pumpkin stem.


Tightly wrap, bottom to top
 
 
 Keep going!


Keep going!
 
 
Once you see the end is in site, cut the Jute and glue in to place.


 I had some silk type leaves from Dollar Tree
 
 
Use a little Hot Glue to add leaves.
 
I used some MOD PODGE on the Jute and twisted it around a pencil
 
or whatever you have. I used a crochet hook


Pull off and reshape


All finished! 


You can make these so fast !
 
I was able to make 12 in about 2 hours .


I originally wanted to make the pumpkins to fill my empty crate that was made with
 
leftover pallet wood scraps. In case you want to know the crate is 18 1/2'' L x 7'' D x 5'' H.
 
I used this stencil from Cathe Holden
 
 
I left the wood natural and used Burnt Umber paint on the stencil
 
 Let me know if you think these are the easiest and the fastest pumpkins you ever made.
 
 
 Thanks again for stopping by!
 
xo Lisa S


Thursday, September 20, 2018

Painted Glass Pumpkin Candy Jar

I found this Pumpkin Candy Jar at the Thrift Store this morning.
 
It was marked  $1.00 and I just could NOT pass it up.


These jars will show up from time to time. They are made by Anchor Hocking and they
 
are still available on their website. Target has these on line.
 
I found the jars on this site for a good price in case you are interested.


I love this jar as is but I really love the silver pumpkins from the
 
POTTERY BARN
 

 Pottery Barn Catalog October 2018


That's the look I'm going for-
 
 
I am going to show you how to make two different versions.
 
 
 One will be painted on the inside only, beautiful shine, looks like Mercury glass, 
 
perfect for Fairy Lights or faux candles
 
but NOT food safe.
 
The other will be painted on the outside only, and can be used for candy


We will need a Jar-
 
Plastic bag, painters or masking tape


Mirror or silver spray paint


 This paint is awesome and it's made for glass.

 
 To paint the outside, cover inside with bag and tape the open edge.
 
 
After paint is dry, flip jar over to paint the bottom.
 

Let dry thoroughly 


To paint the inside only, wrap bag around outside of jar and tape the edge.
 
Paint just the underside of the lid.

 
Let dry thoroughly


Here is a full shot of the mantle


Here are both pumpkins, on the left painted inside
 
on the right painted outside.


 The small glass pumpkins are from the Dollar Tree

 
This pumpkin was painted on the inside
and filled with Fairy Lights


This pumpkin was painted on the outside
and has battery powered votive candles inside.


Here are the Fairy Lights
 
 
These lights came from Target's After- Christmas sale at 90%off .... and ......


The CANDY came from Dollar tree
 
Here is the easiest recipe ever-


''PAYDAY'' CANDY HACK
 
1 Bag approx.  8  oz.  CANDY CORN
 
1 Jar  approx.  8 oz. DRY ROASTED SALTED PEANUTS
 
MIX!

If you love salty sweet YUM!

It tastes a lot like a PAYDAY candy bar.


It's official.... FALL IS HERE!


Thank you for spending some time with me today.

I hope you have a wonderful week.

xo Lisa S


Wednesday, September 19, 2018

How to Upcycle Flannel Shirts with Bleach and Stencils

 I have been seeing a lot of Bleached Flannel Shirts in magazines

 and at the Flea Markets lately.

Country Living Magazine October 2018 Issue


Have you seen them? They almost have an ombre effect.
 
This Flannel shirt in the picture is priced at $119- what?
 
I'm not sure if I am on board with this trend !....definitely not for that price.
 
 
OK... Let's go to our closets and see if we can find a flannel shirt to work with.
 
 
If not let's go to the Thrift Shop.
 
 
Hurry back I will wait for you!


 I have a cotton flannel shirt, a bucket, a hanger, gloves, water and bleach.

All set up, let's do it!


1 cup bleach to 2 cups water

Please work in a well ventilated area!


Time:  about 10-20 min.

Your shirt may need more or less time so keep checking on it.

When it is to your liking remove from the bucket.

Rinse thoroughly,


 1 cup vinegar to 2 cups water

to neutralize the bleach.


Rinse thoroughly again and wash with soap in bucket.


Now hang to dry.


I decided to add a stencil to the shoulders.


I used this Cathe Holden stencil.
http://istencils.com/hakney-stencil-ch-011.html


I used  Navy Blue Acrylic paint

 
On the back below the shoulders.


And stenciled on the pocket.


Let's do another shirt!

I am always up for stenciling.


My son gave me a Flannel shirt that didn't fit him and it fit me nice and baggy!

It had pearl-like snaps instead of buttons-love it.

I thought I might wear it to work in the garden as the weather cools.

I went over to Joann's Fabrics with a coupon and an idea in my head.

I found this stencil set.


The only bad thing was they were paper.

It came with all three designs.


Here's the UPC


I used my 60% off coupon and left the store!


I layed the shirt out flat. Place a piece of cardboard between the layers

of fabric to protect from accidental bleed through.

 
 I used White ACRYLIC paint and a stencil brush.


Use Spray adhesive on the back side of stencil if you have it.
 
It helps to keep the stencil from moving.


Center below yoke stitching


Stencil shirt and allow to dry thoroughly,


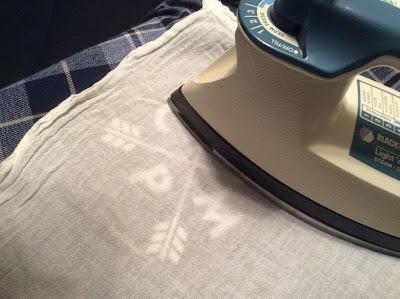
Heat set the painted design using a hot iron and a clean cloth.


My Model


How about another shirt !

 
Here is a different stencil from the pack


On the back of a Flannel Jacket


OK .....one more!

 
On the shoulders
 
 
On the pocket


I used this Cathe Holden Stencil


I think I will hang the shirts on a clothesline behind me at
 
next weeks Flea Market ! What do you think?
 
Silly I know, but I am easily entertained.


I look so forward to the weather changing ! It is still so hot here.

I want to wear soft flannel and drink Hot Chocolate!
 
 
These will be great for working in the yard.
 
Let me know what you think of my upcycled Flannel Shirts.
 
xo Lisa S

Here is another flannel shirt that I stenciled and bleached!


UPDATE:

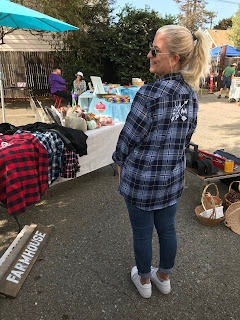
Took the shirts to the FLEA MARKET-
A couple of ladies that bought shirts let me take their pictures.
Don't they look cute?


Faux Tin Tile Bunny

Hello My Friends!  Most of the Craft and Dollar Stores have some chunky cut outs for Spring! There are so many ways to decorate these. I use...