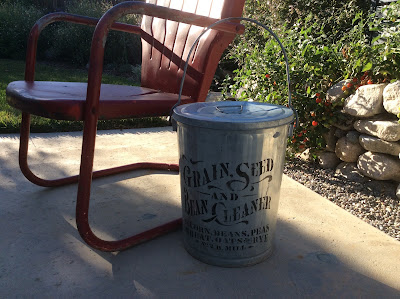
This project will only take about 15 minutes to complete !
Most of that time used will be cleaning the brush and stencil after you are finished.
I found this little trash can at the Thrift Shop, but you can use any bucket or pot.
I wiped it down with a little soap and water.
I bought this stencil online from istencils.com
I decided where I wanted to put the stencil and used Painters Tape to
attach stencil to bin. I used black Acrylic paint and a stencil brush.
According to the stencil directions, they recommend using a
spray adhesive to the back side of stencil to keep in place and to keep clean edges.
I do not use this step. I have found that the istencils are thick not flimsy
definitely a superior product, so this step is optional.
If you are new to stenciling you may want to use this technique.
The bin I used had ridges, but it will not matter because you will
be using a dry brush method ( dip and wipe off excess ) with up and down motion.
Use your free hand ( the hand without the brush ) to hold down the stencil as you move around
your pattern. The paint dries very quickly. Remove stencil and wash with warm water and soap.
Wash brush with soap and water.
I used a Matte Spray Sealer to protect the finish.
My Husband and Son surprised me with this POTTING BENCH that they made
a few years ago and I just love it!
The window is attached and the bottom shelf is removable.
They also added industrial wheels on the legs so I can easily move it around the patio.
Sometimes I clear everything off and use as a serving table.
I like the idea of disguising my trash, but I plan to use it
on my potting bench to hold potting mix.
Thank you for visiting today!
xo Lisa S


What a cute idea. It does give personality to a plain can.
ReplyDeleteDebra
DeleteThank you for your sweet comment! I'm so glad you stopped by. Have a wonderful week! xo Lisa S
Now to find a stencil I love to use. Found you on Blogger's Pit Stop Link Party.
ReplyDeleteCandy
DeleteSo glad you found me, it's nice to meet you! Thanks for visiting and saying hello. xo Lisa S
I love the galvanized bucket. This makes me think that I could create my own stencil and put our names or something similar on the side! I REALLY love the potting table. I would love that kind of thing and I would think it would be fun to use it for serving at a party!
ReplyDeleteMichele, You made my day. I am glad you like my project. The bench was a collection of all kinds of recycled wood from pallets and fence posts.
DeleteThanks for visiting stop by again. xo Lisa S
SO cute... I love this, thanks for sharing! From Blogger’s Pit Stop
ReplyDeleteDenise,
DeleteThank you, I'm so glad you liked this project. I really appreciate you hosting. xo Lisa S
You find the best stencils, Lisa. Thanks for sharing your source at Vintage Charm!
ReplyDeleteYou are welcome! Thank you, xo Lisa S
ReplyDeleteGreat job! I love stenciling. Like you said, quick and easy. Thanks for sharing with SYC.
ReplyDeletehugs,
Jann
Jann,
DeleteThank you for the nice comment!
I appreciate you hosting and visiting.
xo Lisa S
Lisa, this is such a fun project!! Thank you so much for sharing with Wall to Wall DIY Wednesday!
ReplyDeleteThank you so much for hosting! I was glad to find you.
Deletexo Lisa S
Love the upcycling of the trashcan!
ReplyDeleteCalleen,
DeleteThank you so much!
xo Lisa S
Oh this is such a fun project! I love all things galvanized and with a stencil it's a million times awesome.
ReplyDeleteThank you so much for sharing your fun project over at Waste Not Wednesday!
Sam,
DeleteYour comment made my day! I appreciate you, thanks for hosting so glad I can share. xo Lisa S