Wednesday, October 27, 2021

Succulents on Pumpkins

 Hi FRIENDS!

I know you've

seen these

before, but today I'm sharing what I made this week.


This Saturday we will be back to selling at the Flea Market!

I wanted to make my booth look festive so I went looking for pumpkins.

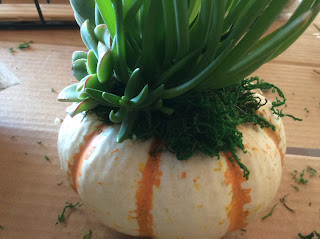
I found these at Trader Joe's. 

They are called TIGER PUMPKINS-

Love the fall colors and stripes!


To attach the succulents, you will need a hot glue gun.


A small amount of floral moss.


And a few cuttings from succulents in your yard

 or the yard of a neighbor!

Try to find a good variety of colors and shapes.

Tip: Gardeners love to share!

I added a few springs of fresh Rosemary for the scent.


Attach moss to the top of pumpkin.

Pieces hanging down looks great and can be trimmed

when you are finished.


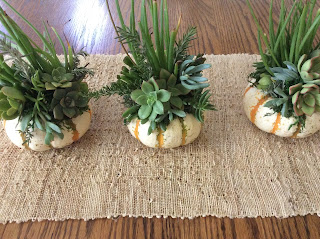
I'm working on three at at time.


I position my succulents like I would

 assemble a floral arrangement.


Taller in the center and work out from there.


Turning the pumpkin as you work, filling in spaces as you go.


Extra moss can be used to help

support tall cuttings.


Fill in nice and tight!


Let's be real-

I made a mess!


But they turned out great!

These will go with me to the flea market and if they don't sell

I will use them for our Thanksgiving table!


Here's a view from above-


I used similar succulents on each
 
of the pumpkins because I wanted a cohesive look.


Your pumpkin will last well over a month since they are not cut.

The succulents can be spray misted with water.


When you no longer want to keep your pumpkin or it starts to get soft,

Just cut through the top portion horizontally and plant the whole top in the ground

OR

You can pinch off the succulents and plant 

only the cuttings.

Don't forget to save your seeds!

I want to see if I can grow Tiger pumpkins:)


Thanks for visiting with me today!

xo Lisa S


Monday, October 11, 2021

Quick and Easy Halloween Decor


Hi Friends,

Just for fun...

I want to share this with you!


Save this label to your computer,

resize to fit your bottles.


Print and trim.


This brown glass bottle was too nice to toss 

after I was done with my drink so I wanted to use it for something!


Use Mod Podge to glue label to bottle.

Then cover top of label 

with a light coat of Mod Podge.

Wipe off any that gets on the glass.


After the label is dry, 

I use white glue and clear glitter 

to give the moon face some dimension.


Then added a piece of raffia-


I found this old 45 record

of Spooky Sounds while out thrifting-

The side eyes made me laugh-


You could use the label to make a

 sleeve to cover a bottle of orange soda!


I'm part of a mid-week October Harvest

 Craft Event and Luncheon, day after tomorrow.

It is a private event with 200 ladies attending.


Shopping and eating , doesn't that sound fun?


That means I 've been busy gathering together items

 and tagging

 and more tagging!


I hope it goes well ! 

It has been a long time since

we have been able to get together like this.

I'll let you all know how it goes.

Maybe I'll take pictures and share.


THANK YOU 

xo Lisa S


Sunday, October 3, 2021

Birch Pillar Candles / Birch Secret Ring Box


Hi Friend,

I spoke too soon last week and the summer came back!

Oh well, it's 95 degrees and I'm in the mood for candles.

I went out to the wood pile, wondering if it will ever be used-


looking for a Birch log.


I found this piece that looks like a HEART!

I have a plan for later-


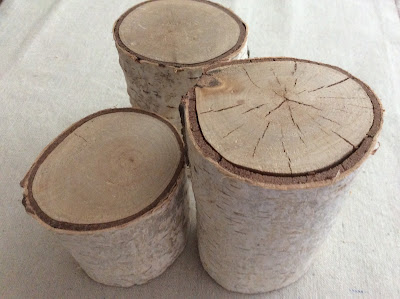
I picked a log and marked it in three different lengths.

Made my cuts and checked the size.


I like things in threes!


We have two choices for candles-


You will need this tool.

It's called a Forstner Bit- 

They come in different sizes
.
It will make the hole and hollow it out.

It is 3/4" the same size as the tea light candles.


It attached to our drill.

Add tape to the bit so you only go to the depth needed.


I didn't like the white candles so I painted the battery

powered ones to match the color of the wood.


These candles are Vanilla scented! I liked their color.

The candles have the metal inserts and the pillars will not burn.

ALWAYS KEEP CANDLES IN SIGHT WHILE BURNING!!!!!!


After the tealights have burned down,

new ones can be easily replaced.


If you don't have any Birch logs available,

These CANDLES are easy to make!


Now for the next project!

To make the Secret Ring Box,

You will need another piece of birch wood and a 1'' long piece of dowel.

My wood is 3" high with a 3'' diameter.


Make a mark for your cut at about an inch.

This will be the lid.


Use this Forstner Bit attached to your drill 

to hollow out your base.


Drill a small hole to fit a 1'' dowel.

Wedge it into place or use wood glue.


Flip lid to the under side. Mark with a pencil where

lid matches the dowel.

Check and double check before you drill hole in lid.

The two pieces need to match up perfectly!

Do not glue the lid. It will turn on the dowel to close.


Wouldn't this be a wonderful secret box for and

engagement ring or wedding bands?


I'll show you how I made this

THANKFUL sign HERE

It is a reverse stencil.


I love candle weather!

I can pretend for now-

Pumpkin candles are my favorite, how about you?

xo Lisa S


Faux Tin Tile Bunny

Hello My Friends!  Most of the Craft and Dollar Stores have some chunky cut outs for Spring! There are so many ways to decorate these. I use...