Showing posts with label wire. Show all posts

Tuesday, January 21, 2025

Heart Shaped Wreath-Wire Art


Hello my friend!

I thought I would share my Wire Art with you.

It's fairly easy and you can't make a mistake.


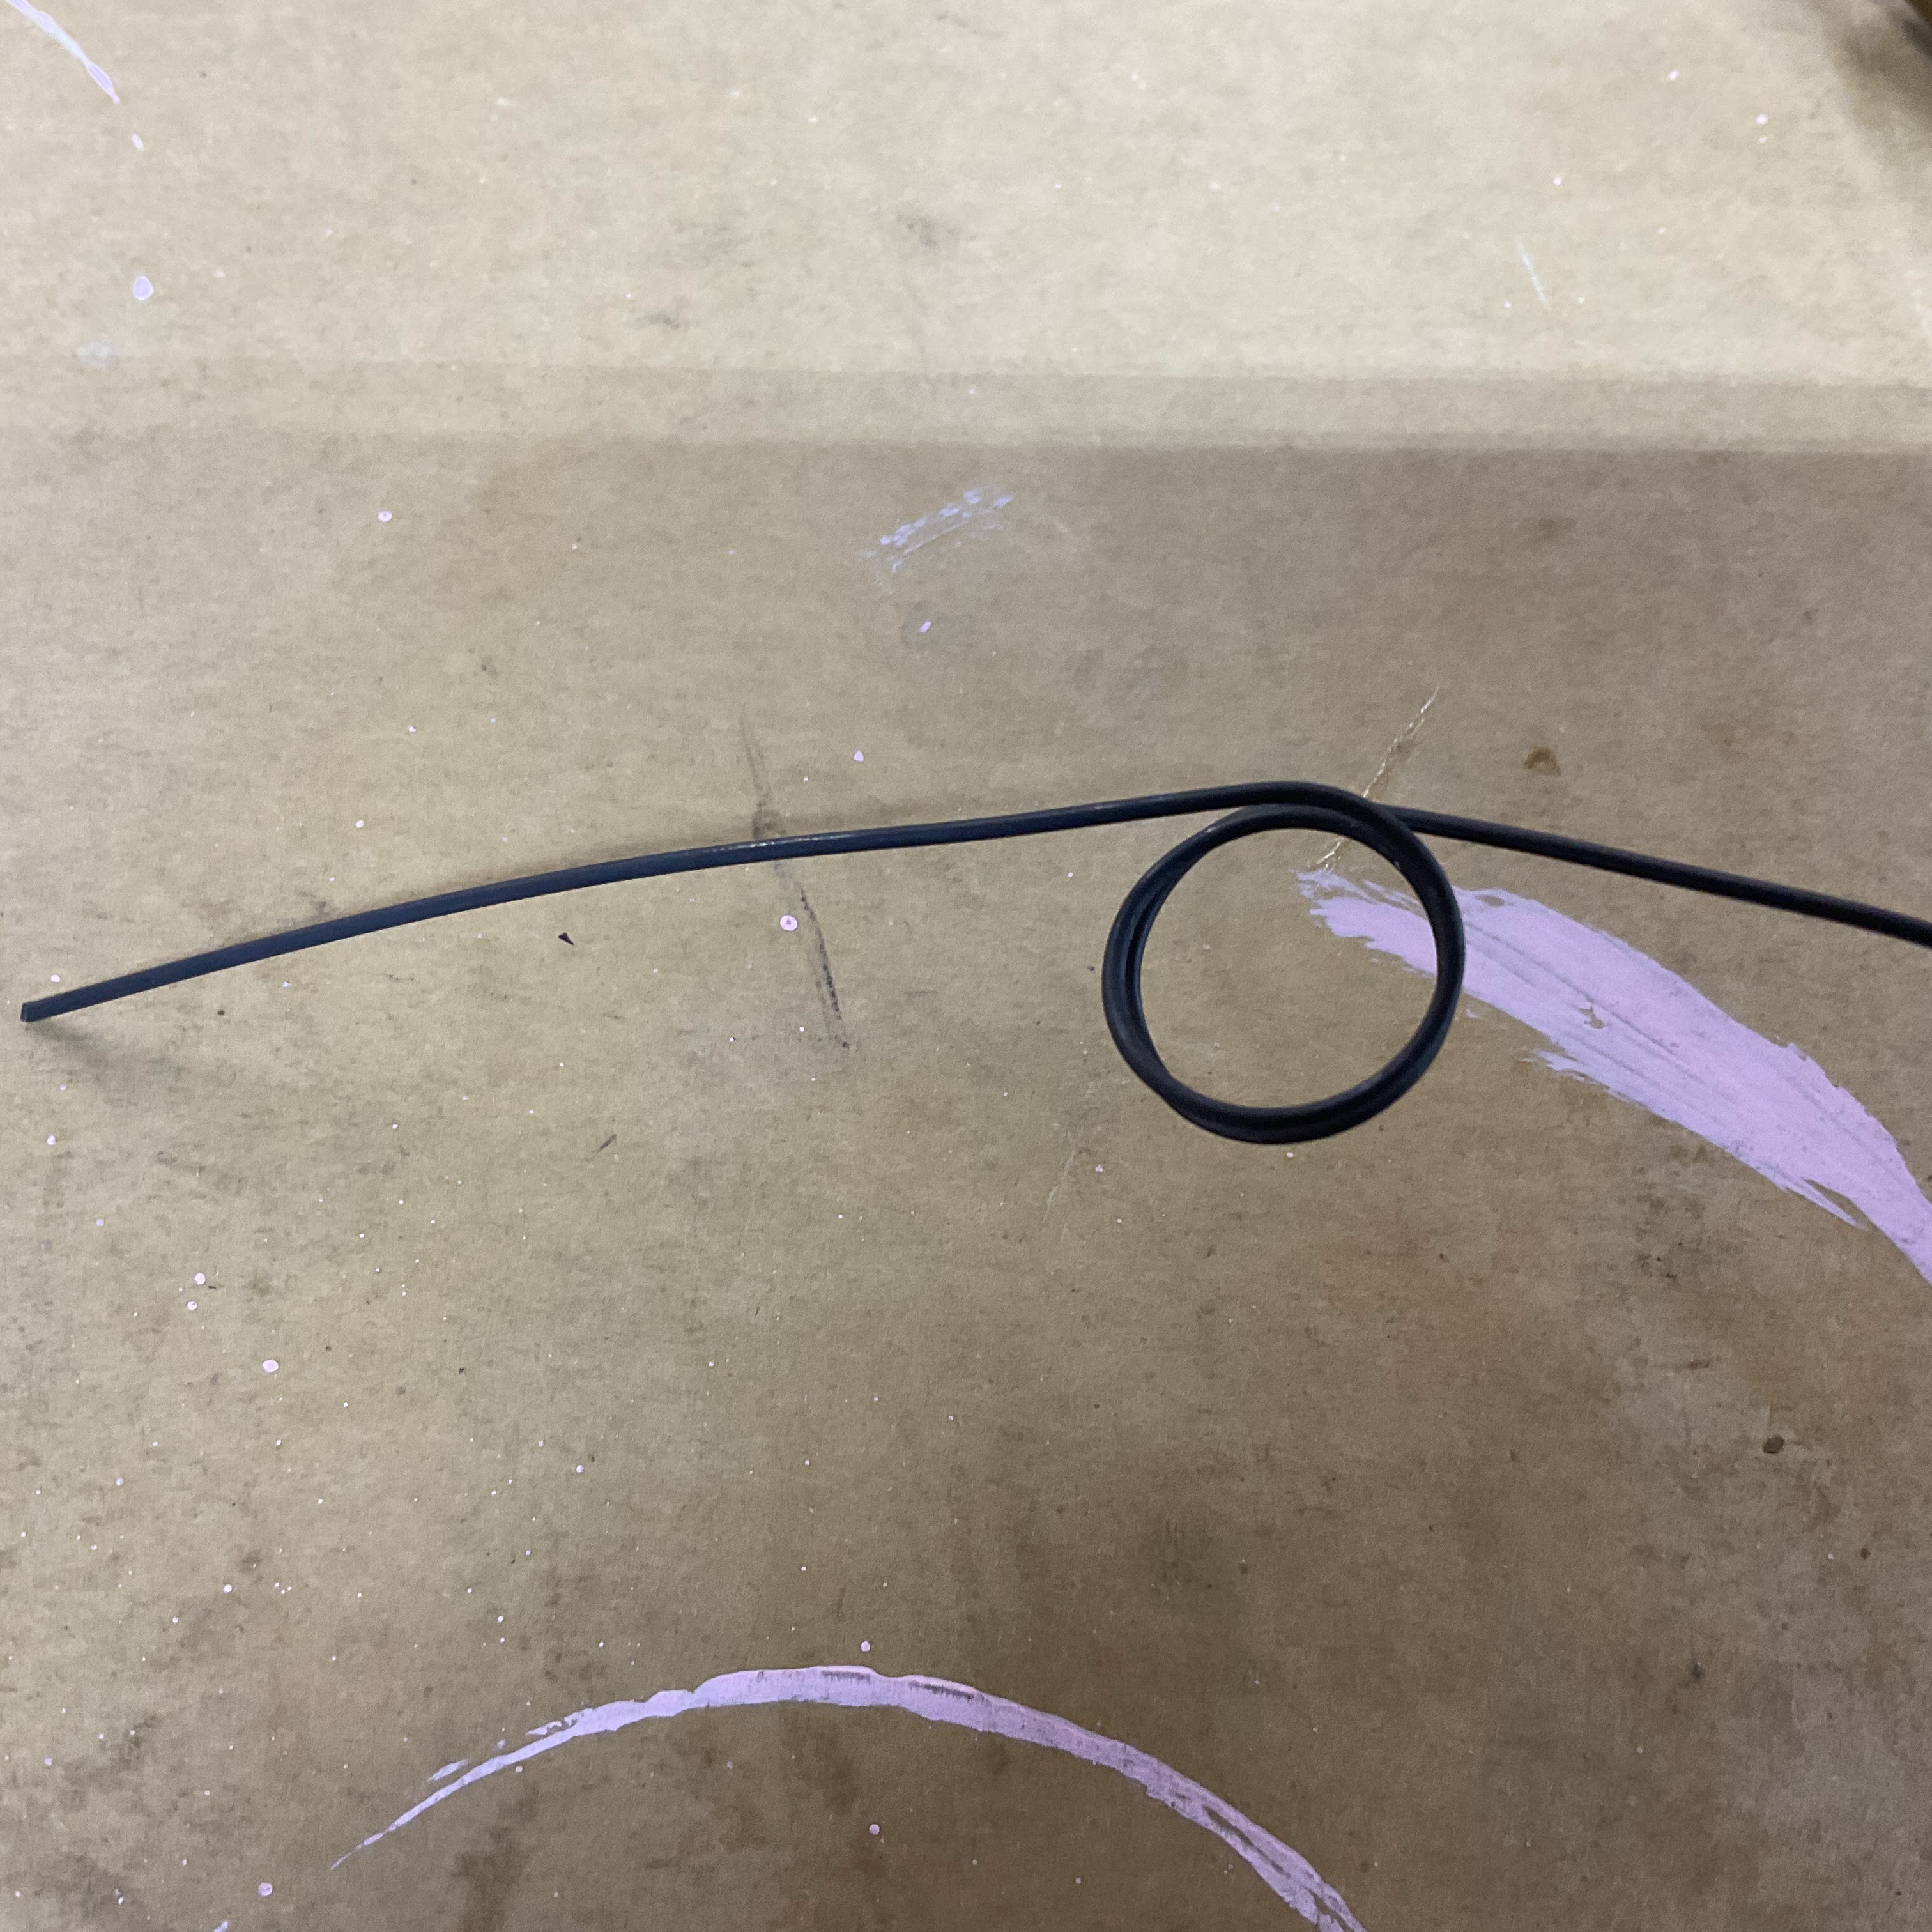
I used Heavy Duty -Bailing Wire-

I bought a roll from Home Depot years ago and use it for

all sorts of craft projects.

You may have some in your garage or barn !

You will also need pliers.

Give yourself a 3'' long tail to start -


You will be working with a continues piece of wire !

Do not cut wire until the end.

I used a sharpie pen as my size guide.

Loop the wire around your guide twice .

I also spaced my loops using the width of the pen.


Remove your guide and make another loop.


It looks better if you can continue the wire in the

same direction.


Continue making loops until you are happy with the size.


Bring the ends together.


Use pliers to twist and connect the two ends.


Twist the ends around the pliers to make a curl.

Lay wreath flat and shape into a heart.

You can use your pliers to help with shaping.


It can be hung plain or wrapped with ribbon.

It reminds me of lace-


Each of the loops will hold a small note or photo.

It could hold Valentines or hanging earrings.....


Thank you !

So nice to have you visit again.

I hope you are having a wonderful week.

xo Lisa S

Monday, September 23, 2024

Old Wood Spool PUMPKINS


Hi friends!

Happy First Week of Fall-

My very favorite time of year!

Just a super quick craft idea today.

A friend gave me some old empty spools last week .

She thought I could use them.

I decided to make some rustic

 place card markers for seating at Thanksgiving Dinner.

I had a roll of orange jute in my gift wrapping stash.


I just wrapped each spool, single layer with the jute.


Went in the yard to find a stick for a stem.

I found a pinch of Spanish Moss in my craft supplies'


I pushed some moss in the spool hole, then pushed in the twig.

These could be finished at this point if you want to make a 

small shelf sitter!

They can sit on a shelf throughout October and November.


I cut a 4'' piece of wire and made 2 loops on the end with 

needle nose pliers.


I poked the wire in the opening-


I cut small leaf shapes out of brown paper.


I wrote names on the leaves-

I need to make some more before Thanksgiving!


The wire is strong and will hold a thick card 

without falling over.


Here are more ideas for spools -


Thank you so much for letting me share with you!

xo Lisa S

Monday, April 22, 2024

Make a Bird on a Perch


Hello Friend!


I found these birds at the local Garden Center.

They had texture like hand carved wood.

I think they may be made of resin or 

some kind of solid plastic material.


I sanded off their tiny feet.


I had this single wooden candlestick that I wasn't using-

I had the idea to cut off one end to make a perch for my bird.


The candle side was metal.

I flipped the candle stick so that the metal top was now the base.

The weight on the base made the 'perch' more stable


I cut a short piece of dowel and set aside.


I made feet for my bird using heavy gauge wire. 

I drilled small holes under the body 

to attach wire with super glue.


Let dry.


I painted the bird with white chalk paint.


When it was dry, I rubbed some antiquing wax

all over the bird.


I used pliers to bend the wire feet around a small

wood dowel piece.


I used wood glue to attach

 the dowel to the candlestick.


Easy!

I like the added height.


-sold-


Thank you for visiting.

I hope you have a blessed week!

xo Lisa S


Friday, November 24, 2023

Vintage Button Trees

Hello my friend!

Thanks for stopping by-

I know I'm not alone when it comes to collecting buttons.

It just happens!

When I was a little girl, I loved playing in my Grandmas' jar of buttons.

So many unique shapes, colors and sizes.


Let's make some easy ornaments

using buttons.


Things you will need:

You will need a few buttons, about 12

in graduating sizes for the tree-

plus about 4 small buttons approximately

the same size as each other to be

the tree trunk base


1 piece of  24 to 26 gauge wire, 12'' folded in half

and 

wire cutter/ pliers


Lay out your graduated buttons


Start at the base of the tree.

'thread' the button through the wire.


Continue up the trunk-


Begin your tree with the largest button

and work upward.


If your button has 4 holes-

thread wire across as shown.


Keep adding buttons

until you are happy with the height of your tree !


My trees are short and fat!


Tighten and twist a couple times using pliers.

Cut 1 wire, make a loop

with the other wire end .


Wrap the wire around the base over the cut wire.

Use pliers to tuck in sharp ends.


Easy!

Now you have some ornaments to

hang or give as gifts-


Add ribbon if you like-


The trees were big hit at my craft show!

I hope you have a great week!!!

xo Lisa S


Note: I also made Snowmen- But I sold out

and only had one picture.


Wednesday, June 28, 2023

Old Chair into Planter


Hello my friend !

How are you today?

On the way to church we saw this sad chair with a free sign.

I am like a magnet to free...

Mr. Fresh Vintage said ''NO WAY, It's gross!"


I talked him into it -

with the promise that I would start on it 

immediately when we got home....

and I did !


Once the nasty cover was gone...

no more stink !


I thought it would be easy to turn into a planter.

The seat was old and the raffia type material was so easy

to remove with a utility knife.

There was old newspapers

 shoved in there too for some reason.


I was hoping for Red-

I needed to run to the store for more.


Have you seen these new Rust-oleum spray cans ?

It has 5 positions for the nozzle.

We thought we would give it a try.


It worked great, we stayed with 'standard' spray


It was a new learning curve and will take some

getting used to in the future.

For this project it worked fine.


It covered well


I wanted the color to pop in the garden.

We don't have a lot of red flowers so

 I thought it would be a good contrast.


I purchased a 16'' coco liner at my local Joann's fabric.

They are on sale right now.


I found a scrap of chicken wire in our shed.

I thought it would give the coco basket some support.


I thought I could staple the wire to the chair and form

a dip in the center.


It worked fine!

 I moved  the chair to a bare spot in the garden

 and filled the basket with potting soil.


It got moved one more time and added a few

starter plants that I had on hand.

I started with Lamb's Ear and Feverfew- they are hardy.

I also added some Oregano.


The chair was doing a good job 

of holding up the Larkspur


Well I had to add a couple flags too!


The wire was a good base and it doesn't even show.

Even though the chair was planted I could still move it around easily.

I like that it covers a spot that I had just cleaned up-


I know it will eventually fall apart and look shabby

but that's okay-


Have a HAPPY 4TH OF JULY!!!!!!

XO Lisa S


1 month later.....


Easy PAPER WREATH for Fall

Hi Friend ! Fall is my favorite time of year and I can't wait to start decorating..... even though it's 90 degrees. Let's make a...