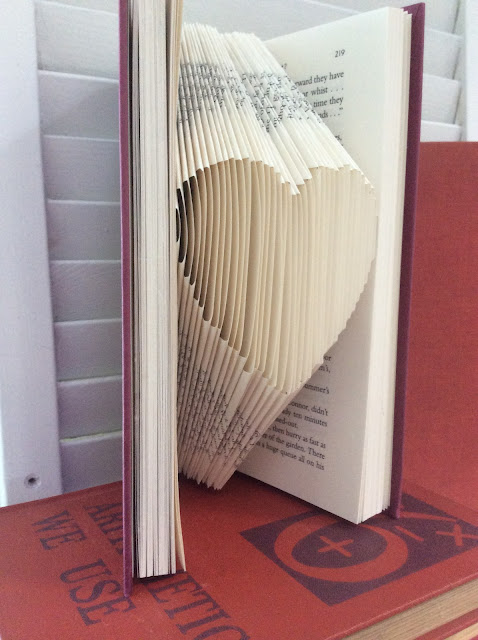
Monday, January 31, 2022

Altered Book -Folded HEART


Hi Friend!

This is were ART and my arch nemesis MATH come together.....

I hope I don't loose you on this one.


Things you will need:

a hard back book over 150 pages

My book was 6'' wide x 8 1/2 '' high with a red cover

a pencil,

a ruler with centimeters markings


This pattern is measured in centimeters.


 Place the book on a table like you would read it.


Open the book to the center. 

This will guarantee that your design is centered in the end.


From the center of the book, count out 20 pages to the left of center and

20 pages to the right of center.

These 40 pages will be the folded design.

I clipped them just to show you.


You can remove the clips, 

but hold your place.

Use a sharp pencil to mark your pages 1-40 at the top right corner.

This will not show because it will be under the fold, but it will keep you on

 track if you get distracted.


Tip: The smaller number should be the top number.


Use a pencil dot to mark you measurements.


Mark all your fold lines first.

then begin to fold.


The first two marks to the pattern are on page 1, from top 7.7 centimeters

 and 8.9 centimeters below.


  If done correctly, you now have marked the first page and there's a gap of

 1.2 centimeters between the two marks. 


Now go to the next page (page 2).

Here you mark  7.1 centimeter and 9.6 centimeter


On page 3 - mark 6.8 centimeters and 10.1 centimeters.


Continue the pattern,

Page 4: 6.6 & 10.5

Page 5: 6.4 & 10.9

Page 6: 6.3 & 11.2

Page 7: 6.2 & 11.6

Page 8: 6.1 & 11.8

Page 9: 6.0 & 12.1

Page 10: 6.0 & 12.4

Page 11: 6.0 & 12.6

Page 12: 6.0 & 12.8

Page 13: 6.0 & 13.1

Page 14: 6.1 & 13.3

Page 15: 6.1 & 13.5

Page 16: 6.3 & 13.7

Page 17: 6.4 & 14.0

Page 18: 6.6 & 14.2

Page 19: 6.8 & 14.4

Page 20: 7.1 & 14.6


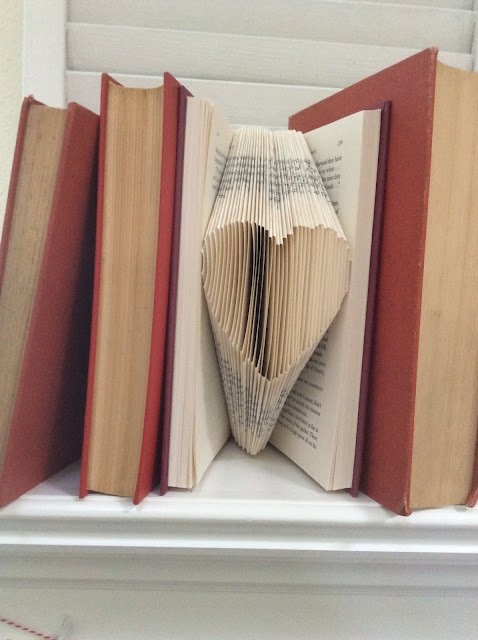
This is the center of the design,

We are now repeating the design in reverse.


Page 21: 7.1 & 14.6

Page 22: 6.8 & 14.4

Page 23: 6.6 & 14.2

Page 24: 6.4 & 14.0

Page 25: 6.2 & 13.7

Page 26: 6.1 & 13.5

Page 27: 6.1 & 13.3

Page 28: 6.0 & 13.1

Page 29: 6.0 & 12.8

Page 30: 6.0 & 12.6

Page 31: 6.0 & 12.4

Page 32: 6.0 & 12.1

Page 33: 6.1 & 11.8

Page 34: 6.2 & 11.6

Page 35: 6.3 & 11.2

Page 36: 6.4 & 10.9

Page 37: 6.6 & 10.5

Page 38: 6.8 & 10.1

Page 39: 7.2 & 9.6

Page 40: 7.7 & 8.9

This should take about 1 hour :)

After you mark the pages, then you can begin to fold.


Folds are made in a right angle which means
the folded edge is parallel with print lines.

Each fold makes a secret pocket!


I had my family over for dinner.
My Mom helped me with my first Prime Rib!
 Mom and I made these while dinner was cooking.
The Prime Rib was incredible!
We had our belated Christmas together,
yes even opening presents-
 and then she could take her book home for Valentines day.
xo Lisa S

Monday, January 24, 2022

Altered Mini Books


 Hi Friends!

Here's a little something that I like to have on hand for gift giving.

These mini composition books come three to a pack.

They were from the Dollar Tree.

I know I have also seen them at Walmart.

All you need is some paper scraps and glue.


These tags were from Dollar Tree.

I like to stain them with coffee-

strings included.


These zipper seal bags were from Dollar Tree.

The books fit inside perfectly!

I like to use the bags to protect the books

if the books are going to a craft sale.


I just love ALL of Tim Holtz 

idea-ology product line.

Have you seen these?

Tim calls them paper dolls.

You can use them for all types of crafts.

They are full of detail and pre-cut for you !


I have this 1969 reprint of a 1902

Sears Catalog- 


I love to use pages for background in handmade cards

and books. It has well over 1200 pages.


I also like to use sheet music in my crafts.

I couldn't be happier!


 A little scrap of antique lace on the spine

to finish the book.


BFF's


A small torn crumpled circle with a button

makes a sweet flower on top of a lace scrap.


Sometimes I photo copy my paper dolls so I can use them more than once.

Then I can use watercolor paint or use colored pencils.


The inside is covered with paper

 and stained with coffee.

Coffee can be spay misted, dribbled, brushed or sponged on!


Young love


Another book with a page from the dictionary,

a scrap of sheet music, a bit of torn cloth and

a rose and a paper doll.


Cover label reads-

A scrapbook of random inspiration
 and things of note


A scrap of lace can look like wings

for a bit of whimsy.


Grocery List


The mini books fit just right in the bags.


Your guess is as good as mine


This sweet boy was sitting so I put him

on top of a sticker, I added the wings- borrowed

from a butterfly.

Go forth and be Fabulous !


I hope my examples 

gave you some inspiration.

xo Lisa S

Tuesday, January 18, 2022

Making Velvet / Wool Mushrooms


Hi Friends!

I was so inspired by Claire at Pillar Box Blue.

Claire's' Fabric Mushrooms are wonderful

but I ran out of time at Christmas.

She gives a great tutorial,

check out her beautiful creations !

I made my mushrooms a bit different.

I thought I would make mine for Valentine decoration-


Fungi for your Fun-Guys ...sorry really dumb joke ;)

I had some scraps of red wool and pink velvet.

For the stems, I used cotton batting.

My mushroom cap was a 3 1/2'' circle.


The underside of the cap is 1/2''

smaller than the outside.


Pinned together below just for show.

The pins will get in the way when stitching.


Roll a 1/2'' over to the underside of cap material.


Use a blind stitch to complete the circle.


I used some small clear glass seed beads for spots

on the caps.


I used embroidery thread on the underside.


Started in the center and continued around the edge.


Spacing is about a 1/4'' apart.


Ending in the center.

The knots will be covered by the stem.


For the stem, I cut a rectangle about 2'' wide by 3'' long.

Roll the width of rectangle and secure with fabric or hot glue.

Glue to center or cap.


My favorite glue is this Beacon 3-in-1 glue


I added a pinch of moss at the base.


I liked them just laying around-


I put some in an ivy topiary I have-


Then I glued a couple on top of a moss covered stump.


To You

💟

From Me


If you liked these mushrooms, here's a link to my


Thank you for visiting today!

xo Lisa S

Faux Tin Tile Bunny

Hello My Friends!  Most of the Craft and Dollar Stores have some chunky cut outs for Spring! There are so many ways to decorate these. I use...