Sunday, December 30, 2018

How to make an Altered Book Planner-Calendar

 
Happy New Year !
 
 I don't know about you but I still like to use a hand held Planner-Calendar.
 
One that I can write notes to myself, check over appointments,
 
do menu planning, write down shopping lists,
 
a bit of doodling and a general to-do list.
 
I don't always take the time to add things to the calendar on my cell phone.
 
I have been on vacation from work for 2 weeks....
 
everyday my phone told me I was late for work because I didn't change
 
my calendar on my phone !  :)


So I thought I would share with you this altered book version-


 You will need a planner. I found mine at Dollar Tree.
 
A book approx. the same size and thickness as the planner.
 
A sheet of cardstock
 
A utility knife
 
Tacky Glue
 
and an optional scrap of ribbon
 
scissors
 
a straight edge ruler
 
and a pencil


 This is my planner from Dollar Tree.
 
I removed the plastic pocket sleeve.


 It had a heavy cardboard cover.


 An old math primer I had on hand was just the right size.


This is the cardstock I used. 


 I used a utility knife to remove the pages.
 
 Be careful not to cut all the way through.


 Your book will look like this.


 Laying out flat to show the outside cover
 
and the inside.


Cover the inside spine area with paper . Approx. 2'' wide and the length of the book.
 
Optional bookmark ribbon can be added here.


Measure your cardstock.
 
 
Add 1/4'' to actual size needed. Then add another 1/4'' for your cut line.
 
Use a straight edge up against your line to make your fold.
 
 
You are making a pocket for your planner. Do not glue down the fold!
 
You are gluing the outside of the fold to your book.


Let dry,
 
slip planner into pocket
 
 
 Fold cover back to make this easier.


Tuck and glue a scrap of ribbon into the top, for a bookmark


 The cover can be used the following year by just removing the old
 
planner and replacing with another.


Just mixed in with other books on the desk. 


 Thank you for letting me share my planner with you !
 
Let me know, have you gone paperless?
 
Do you like to keep a calendar ?
 
xo Lisa S


Tuesday, December 18, 2018

Vintage NATIVITY and ANGEL Postcard Printables

 
Merry Christmas! 


I love Christmas Carols and I thought I would leave you with this,
 
It is one of my favorites. It can be read as a poem.
 

 O come all ye faithful
Joyful and triumphant
O come ye o come ye
To Bethlehem
Come and behold Him
Born the King of angels

O come let us adore Him
O come let us adore him
O come let us adore Him
Christ the Lord


Oh come, all ye faithful
Come let us adore Him
Oh come, all ye faithful
Come let us adore Him


Sing choirs of angels
Sing in exultation
Sing all ye citizens
Of heaven above
Glory to God
All glory in the highest

O come let us adore Him
O come let us adore him
O come let us adore Him

 Christ the Lord


Blessings to you and your family.
May you share a joy filled Christmas with those you love.
xo Lisa S


Sunday, December 16, 2018

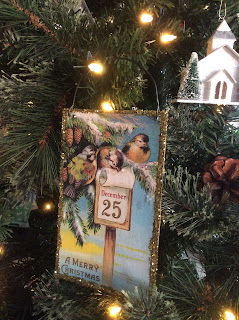
Vintage CHRISTMAS BIRDS

.......And a quick ornament at the end.
 
I just love Birds and these postcards are so sweet !


Here is a last minute idea !


Print one of the cards, then trim with scissors.
 
Find and old frame at the thrift shop, Dollar Tree or from your own stash.
 
Frame and display your print. Then change it for the next holiday or season.
 
OR
 
Use a piece of cardboard or cardstock as your postcard backing.
 
Paint or embellish with glitter. 
 
Use a small hole punch to add wire or ribbon hanger.
 
An easy ornament that can be mailed or tucked inside a gift.


I used Gold Acrylic paint on the edge, white glue, gold and white glitter.
 
 
A piece of wire for a hanger.


Hang on the tree or wall
 

I added a scrap of antique lace.

 
 The card reminded me of my little sparrow.
 
 
Birds always remind me of  God's great love for us!
 
 
  Matthew 6:26 ESV   
 
                                   Look at the birds of the air: they neither sow nor reap

                                                          nor gather into barns,

                                            and yet your heavenly Father feeds them.


                                                   Are you not of more value than they?  


I hope you enjoy this collection.
xo Lisa S


Friday, December 14, 2018

How To Paint Buffalo Check on Mini Gumball Machine

 
I have been seeing  hundreds of gumball machines turned into the cutest snow globes.
 
When I went to THE DOLLAR TREE .... yes again, I found these mini's !
 
They are only 5'' tall.
 
I decided I would just paint them and use them as is- but you could change them to snow
 
globes or tree ornaments if you prefer.


I know you are thinking '' Does this girl do anything else besides shop at Dollar Tree?''
 
Well.... yes I do go there A LOT,  but I find so much inspiration.
 
I hope you are not too sick of these 1 dollar crafts!


The mini's have a removable cap, but the globe does not remove.
 
Set the gumballs aside for now or go ahead and fill.
 
The bubble gum is pretty good :)
 
Update: The gum is gone, but SKITTLES will work fine in the dispenser! 
 
These fully working mini's already have vertical ridges on their sides
 
 so we will use those ridges as our lines. You know me I don't use tape if I don't have to !
 
You will need paint and a small square tip brush.
 

I used Tuscan Red and Black


I painted the large vertical ridges with Tuscan Red
 
 
Paint the horizontal lines top and base then estimate your center stripe line.
 

Every place where the paint overlaps you will paint a black square.
 
A square brush like the one shown will make your work easier.
 
 
That's it !
 
 
These cloth Buffalo Check trees were my inspiration.


As a snow globe, with one of my handmade snowmen
 
sitting on a piece of cotton batting.
 
 
Just sitting on a shelf

 
Here they are together.


They are a pretty cute little gift for a dollar....
 
Thanks for visiting- xo Lisa S 


Holiday Boutique Best Seller Hostess Gift

Hello my friend!  Today I want to share with you some of the projects I started working on for the Holiday season. For me, my first craft sh...