Showing posts with label Dollar Tree. Show all posts

Sunday, August 31, 2025

Sugar & Lavender GARDENERS HAND SCRUB

Hello friend,

I love to give gifts from the garden.

Here's a very simple

 and inexpensive gift that just about anyone

would appreciate.


You only need 3 ingredients.

I found coconut oil at my DOLLAR TREE.


To make the scrub:

1/2 C. Coconut Oil- melted in microwave

1  1/2 C. White Sugar

10 Drops Lavender Essential Oil

1 tsp. Lavender Buds- Optional

Clean jars with lids

(This recipe will fill 3 of these Ball jars )


Mix together and fill jars.


To use the sugar scrub:

Start with clean hands,

Take about an 1/8 of a teaspoon

of the scrub and put into your palm.

Rub front and back of hands.

Then rinse with cool water and pat dry with a towel.

The sugar will wash away and the 

oil and fragrance will remain.

Your hands will feel so soft !


It works great on feet

Then add socks !

NOTE:

DO NOT USE IN THE SHOWER!

It will be slippery and dangerous.


For a special touch, make labels for your scrub.

These beautiful labels came from

The Graphics Fairy

Please visit The Graphics Fairy !

(I used a different recipe )

The labels are the perfect size for wide mouth Ball jars

I cut out my labels and gave the front a light coat of MOD PODGE.


This will protect the paper.

Make sure your ink has dried first!


I used MOD PODGE again to adhere the label to 

the lid inserts. Let dry.

If any coconut oil gets on the label the Mod Podge

will protect the paper.


I divided my recipe into thirds and filled the jars.

Top off with more buds if you like!


Set the insert on the jar and then the ring.


I filled 6 jars, we will see how they do at the Fall Craft Fair.

I plan to make another batch for gifts.


Have a blessed week!

xo Lisa S


Wednesday, August 20, 2025

Back to School Crayon Box Junk Journal

Hi Friends!

Today I'm making a junk journal from a box of crayons-

Back-to school sales had these for .49 


I saved the crayons in a Mason Jar.


I found this card stock pack at DOLLAR TREE.


It reminded me of crayon colors


I used scissors to cut open the box top, bottom and
right side.


I laid the box flat to measure the paper for the inside.


I plan to make a hidden spine so I did not

glue the lining paper inside-


I measured and folded my signature pages. 

I wanted it to look like crayons.


Each folded page has other lined paper inside.


Each signature is sewn to the lining.

Some pocket pages were added.


Here's the spine-

I glued the lining inside the box.


Then the fun part-


I added rick-rack, paperclips, small pictures


This butterfly pin looked great with this paper.


Stitches are hidden


Here is the back side.


Here is the front!


And a top view-


Thank you for visiting !

xo Lisa S

Friday, June 13, 2025

DIY Water Marbled Buttons


Hello Friend!

To make these beautiful Hand Painted

Water Marbled Buttons-

You just need a few things you probably already have on hand!

First find your old button jars or ask Grandma!


You will need some buttons-

I thought the bigger the better!


You will need an assortment of nail polish.

Any color you prefer.

I don't paint my nails ever, these are just for crafts.

The cheaper the better.

Dollar Tree has polish for $1.25

( If you are using old polish, you can revive it with a few drops of

polish remover in the bottle and shake well.)


Some bamboo skewers


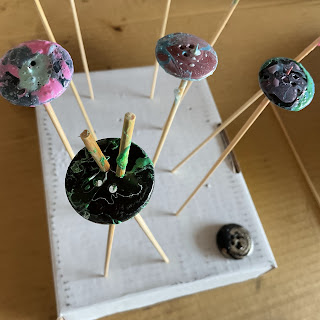
I poked holes in a box to allow my buttons to dry.


A small glass jar or bowl, filled with lukewarm water.


Before you get started, loosen the lids on the polish so you can work quickly.


Add a few drops of the nail polish- 2 or 3 colors.

Use a toothpick to quickly

swirl the colors together-


Submerge your button, swirl and pick up the color.


Stir around the rim to pick up the left over color


Remove the film, wipe off on a paper towel

 before you add more color for the next button.


Stand your skewer up to dry.


Keep going it's so fun!


9

Don't forget to tighten the lids again!

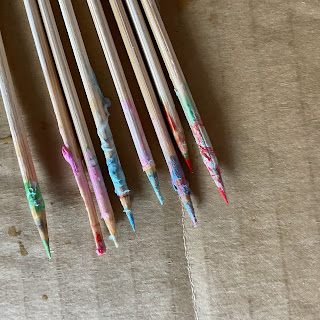
I thought the sticks even looked pretty!


After an hour the buttons were dry.

I was so glad because I hate to wait !

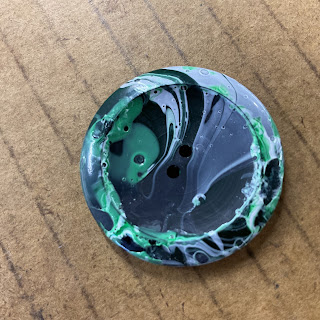
They have interesting texture.

I liked the flat buttons best.


I didn't like this one so I just dipped it again.


This one also got a second dip.....much better.


This one was my favorite


and this was the back side.


I dipped both sides- then you can pick which side is best.


I picked this side for the front.


These are so easy to make!

Make a bowl full!

They would be perfect closures for Junk Journals, charms or used in jewelry making.

These beautiful button cards on marbled paper were made

by Dragana @ www.saacibo.com

She is a wonderfully talented designer who shared this

download for personal use.

Visit her website if you would like the button card.

I printed mine on cardstock and rounded the edges.


I used an awl to mark the holes and attacked the buttons to the card

with string.


The bow on the front didn't look good-


so I tied it in the back.


I like them on the card for now-

I'm not working on any journals but I can save them

for another time.


They fit nicely in a Pyrex dish-


In my craft room ready to be used or given as gifts!


Easy clean-up !

Aren't they pretty ?

Next time I'll try some small buttons and make some earrings.

Thank you for visiting!!!!!

xo Lisa S

Easy PAPER WREATH for Fall

Hi Friend ! Fall is my favorite time of year and I can't wait to start decorating..... even though it's 90 degrees. Let's make a...