Showing posts with label wreath. Show all posts

Monday, September 8, 2025

Easy PAPER WREATH for Fall

Hi Friend !

Fall is my favorite time of year and I can't wait to start decorating.....

even though it's 90 degrees.

Let's make a wreath!

I have this wonderful book that I got at the Library store.

It is filled with old fashioned double sided card stock paper.


I pulled out about 8 pages.


I was able to cut 4 leaves from each page.


I used this pattern for the leaves.


I cut a few and decided to only use the oak leaf pattern.

I chose earth tones, golds and greens.


I used a thrifted embroidery hoop as my wreath form.

This hoop was 14'' across.

I got out my white glue-

I  glued the leaves along the edge going the same direction-

it really took only a few minuets.


The back side is pretty too! 


It reminds me of old- fashioned Calico fabric


Thanks for visiting!!!!!
xo Lisa S


If you liked this wreath-

You may enjoy another,

here is the original Book Page wreath.

Tuesday, January 21, 2025

Heart Shaped Wreath-Wire Art


Hello my friend!

I thought I would share my Wire Art with you.

It's fairly easy and you can't make a mistake.


I used Heavy Duty -Bailing Wire-

I bought a roll from Home Depot years ago and use it for

all sorts of craft projects.

You may have some in your garage or barn !

You will also need pliers.

Give yourself a 3'' long tail to start -


You will be working with a continues piece of wire !

Do not cut wire until the end.

I used a sharpie pen as my size guide.

Loop the wire around your guide twice .

I also spaced my loops using the width of the pen.


Remove your guide and make another loop.


It looks better if you can continue the wire in the

same direction.


Continue making loops until you are happy with the size.


Bring the ends together.


Use pliers to twist and connect the two ends.


Twist the ends around the pliers to make a curl.

Lay wreath flat and shape into a heart.

You can use your pliers to help with shaping.


It can be hung plain or wrapped with ribbon.

It reminds me of lace-


Each of the loops will hold a small note or photo.

It could hold Valentines or hanging earrings.....


Thank you !

So nice to have you visit again.

I hope you are having a wonderful week.

xo Lisa S

Sunday, May 23, 2021

Shiny Brite Wreath- Red, White and Blue!

 Hi Friends,

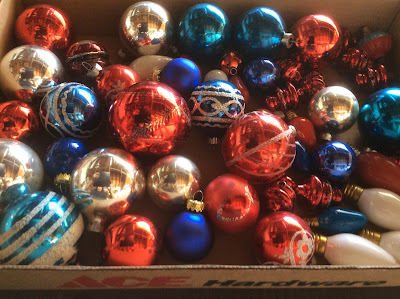
I decided to make another Shiny Brite Ornament

Wreath today in Red, White and Blue.


I collect them throughout the year at thrift shops and garage sales.


I was thinking it would be nice to have for

Memorial Day as well as Independence Day.


I have some of my ornaments separated by color.


I was pretty sure I had enough.


I started with a wreath form, and covered it with

Tinsel Garland-

You can find it year round but I stock up after the holidays.


Ready for ornaments!

You will need a hot glue gun and lots of glue.


I set aside some other special ornaments to use.


Plug in your Glue Gun!

I started with large ornaments first

then smaller.

You can add small tuffs of garland in gaps.


Use a generous amount of glue, but not so much that it shows.

Remember: The tinsel is holding the ornament in place!


I like to rotate the wreath for balance,

Then I pick where I want the top.


Then just keep going....you will need a couple hours to complete.


Eventually you will decide when you are done!

I added a ribbon to the wreath form for hanging.


Store flat -under the bed is a good place :)

Note: Do not store your wreath in a hot place like a garage or attic.
The heat may effect the glue and ornaments could fall off and break.


Happy Memorial Day!

xo Lisa S


Here is another version in PINK


Monday, April 19, 2021

A Fresh Lavender Wreath

 Hi friends,

This week went so fast!

My garden is in full bloom and I really needed

to trim my Lavender to keep it in shape.

Every time I planned to trim the plants,

 the bees had

their own idea. 

I'm going to have to wait until

sundown  when the bees go home!


Ok, I was able to cut my lavender.


I cut it in the dark!

Here's my cuttings before I trimmed them- what a mess.


I always save the rings from my broken

tomato cages.

They make a great base for a wreath!


I used a small gauge floral wire and one ring.


I cut the stems to about 4''.

I pinched together about 5 or 6 stems

and attached to the ring using wire.


Then add another small cluster on top of the previous stems.


Continue all the way around the ring.


Trim the stems. and tuck behind the starting point.


Wrap wire and finish off with a loop if you like.


This is the back side-


Oh it smells so good!

I will sleep good tonight :)


The wreath will look and smell wonderful

for a while.

I think this would be a nice gift for a Mom or a friend on Mother's Day.


xo Lisa S


Friday, March 27, 2020

Springform Pan Spring Planter

Hi Friends,


I'm going to make this thrifted Springform Pan

into something pretty to hang on the  wall for Spring.


For the Planter

You will need :


A Springform cake pan-   my pan is 10"

Rope scrap or chain 30''

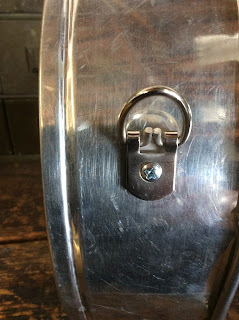
2  heavy duty type picture hanger hooks

Any type of  Super Glue Gel


I marked the sides of the pan where i wanted the hangers.

Then I used Super Glue Gel and tape until the glue set.


This pan was thin and I was able to use

the sheet metal screws that came with the hangers for extra hold.


I measured the pan and cut in half with tin snips.

The edge is sharp, be careful!

I used a hammer to flatten the edge and that helped.


I glued one half to the outside rim.

Make sure your hanger pieces are level and facing upward.


The tape will hold it in place.

Add a little weight on it if you think it's needed.


Then glued the other side.

There's your pocket planter.


I had a scrap of rope, about 30 ''.

Just looped it through the hooks I added and tied  knot.

The rope was from Dollar Tree.


This floral foam block came from

The Dollar Tree.

Then I used hot glue to cover the foam with Spanish Moss


I added  some artificial greenery to the planter.

It really did not need much.

I found the Baby's Breath, Boxwood and Lamb's Ear at

 Walmart for $2 or less per stem.


I had this faux nest in my stash.


It was easy to put together.


I used 2 small magnets to add a sign to my planter.

No need for glue!


The Dollar Tree has been putting out these galvanized sets each season.

There are three in a pack- well worth $1.

I've collected Fall, Christmas, Valentines and Spring.


WELCOME was in the Fall pack.

I painted this sign piece white, so it would

stand out against

the planter.


I can change the sign over and over-


I went through my cans of  spray paint and found, Rustoleum Peek-a Boo Blue.

"Happy Easter" came from the Dollar Tree,

it was in the spring set along with the word -"blessings".


Tell me what you think.

Mr. FreshVintage hated this idea at first......

then it  started to grow on him.


It's so nice to have you here!

I hope you have a wonderful week.

xo Lisa S


You can see more baking pans as planters here.


Easy PAPER WREATH for Fall

Hi Friend ! Fall is my favorite time of year and I can't wait to start decorating..... even though it's 90 degrees. Let's make a...