Sunday, August 25, 2019

Repurposed Trivet Set into Pumpkin Patch Sign


Hello Friends!

I'm thinking about FALL...My favorite time of year.

This repurposed project is so silly, I almost don't want to share it with you.

Oh well, let's just do it!

To be honest with you. I'm not sure what these are or what they would be


used for. It's a set of 3, with cork on one side- wood on the other.


This is the back side...they kind of looked like pumpkins to me.


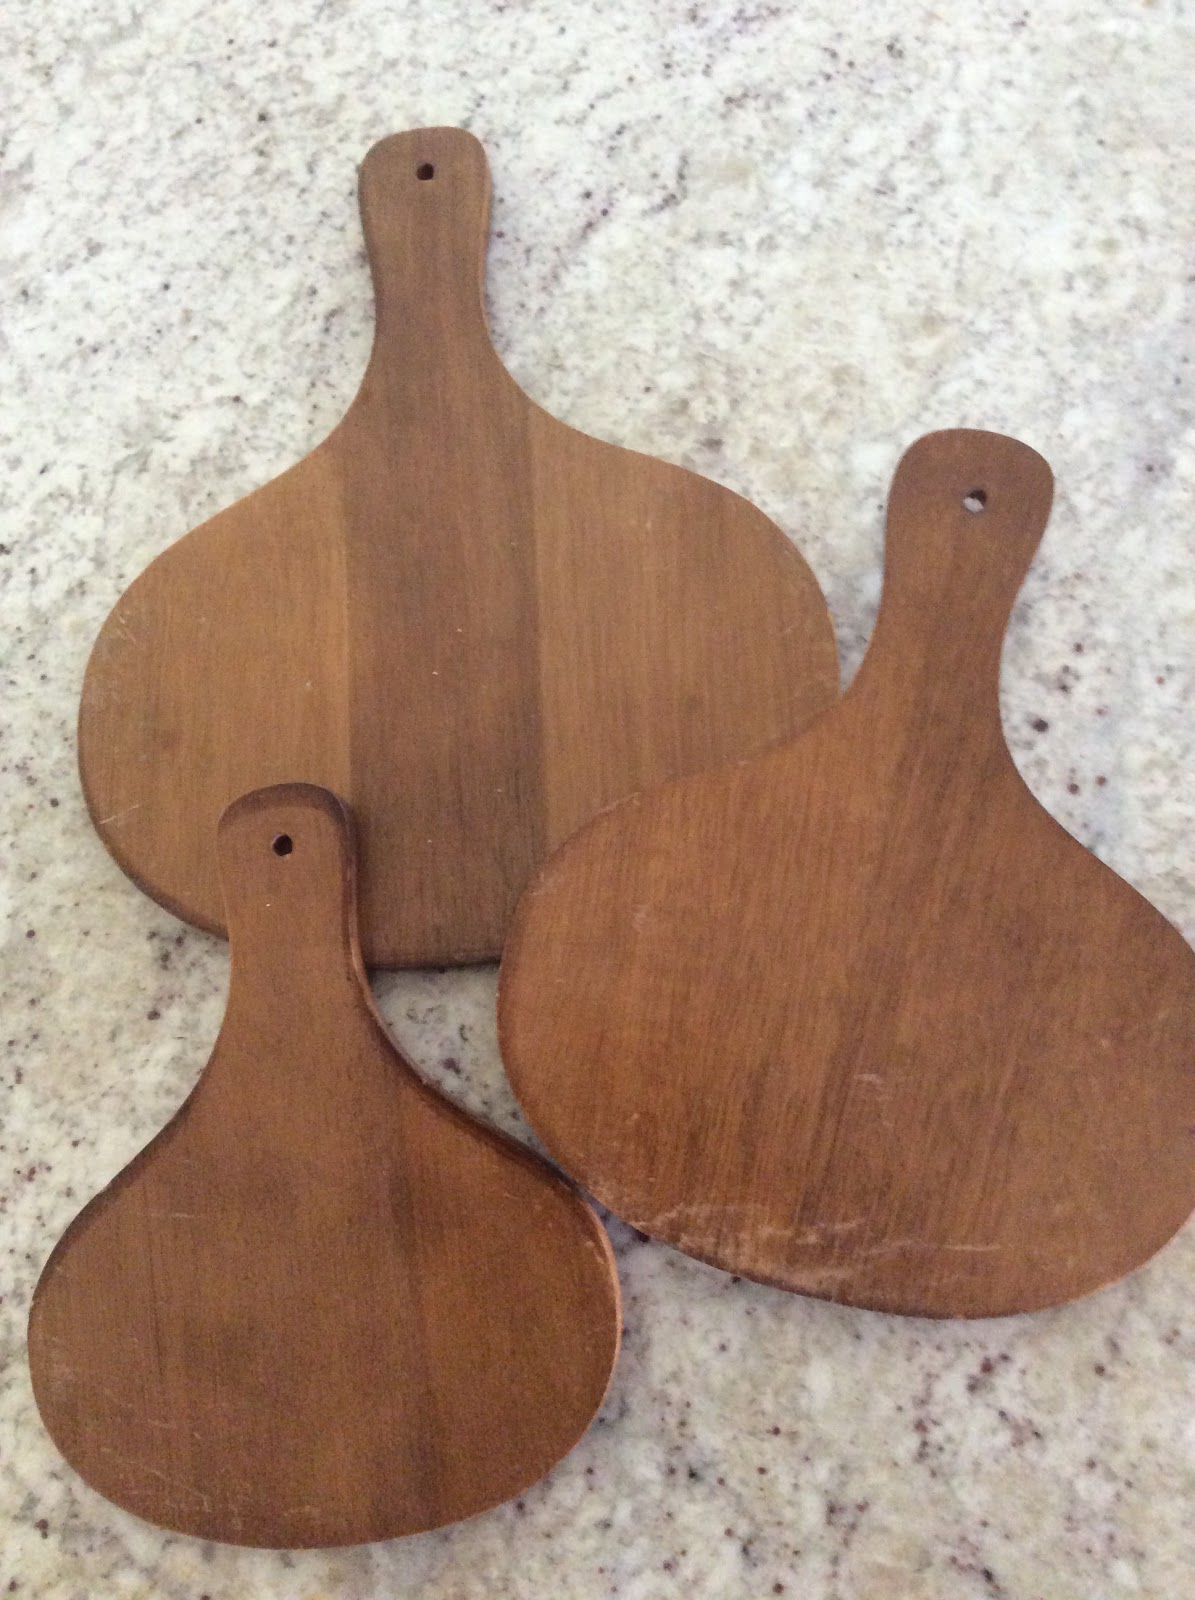
I always tell you how much I paid...

It was 1/2 price day at the thrift shop by my house and I paid 1.00 for the set.


I already had some paint in the color- PUMPKIN


I painted the back sides and left the handles to be the stems.


I just free handed the signs using a Sharpie.

Then sanded the edges a bit, and went over the top with some stain.


You know me I love my Briwax.


I used a chop saw to shorten the handles-


I had an old 5' tall wood post.

Since the pumpkins were thin and small. I just used wood glue to attach

to the post. They were held in place with my favorite

Mickey Mouse Clamps!


See the hidden Mickey?


The glue held quickly.


I used a scrap of wood as a spacer.


I added some Raffia tied to the stems and wire twisted around a pencil


to make pumpkin tendrils.


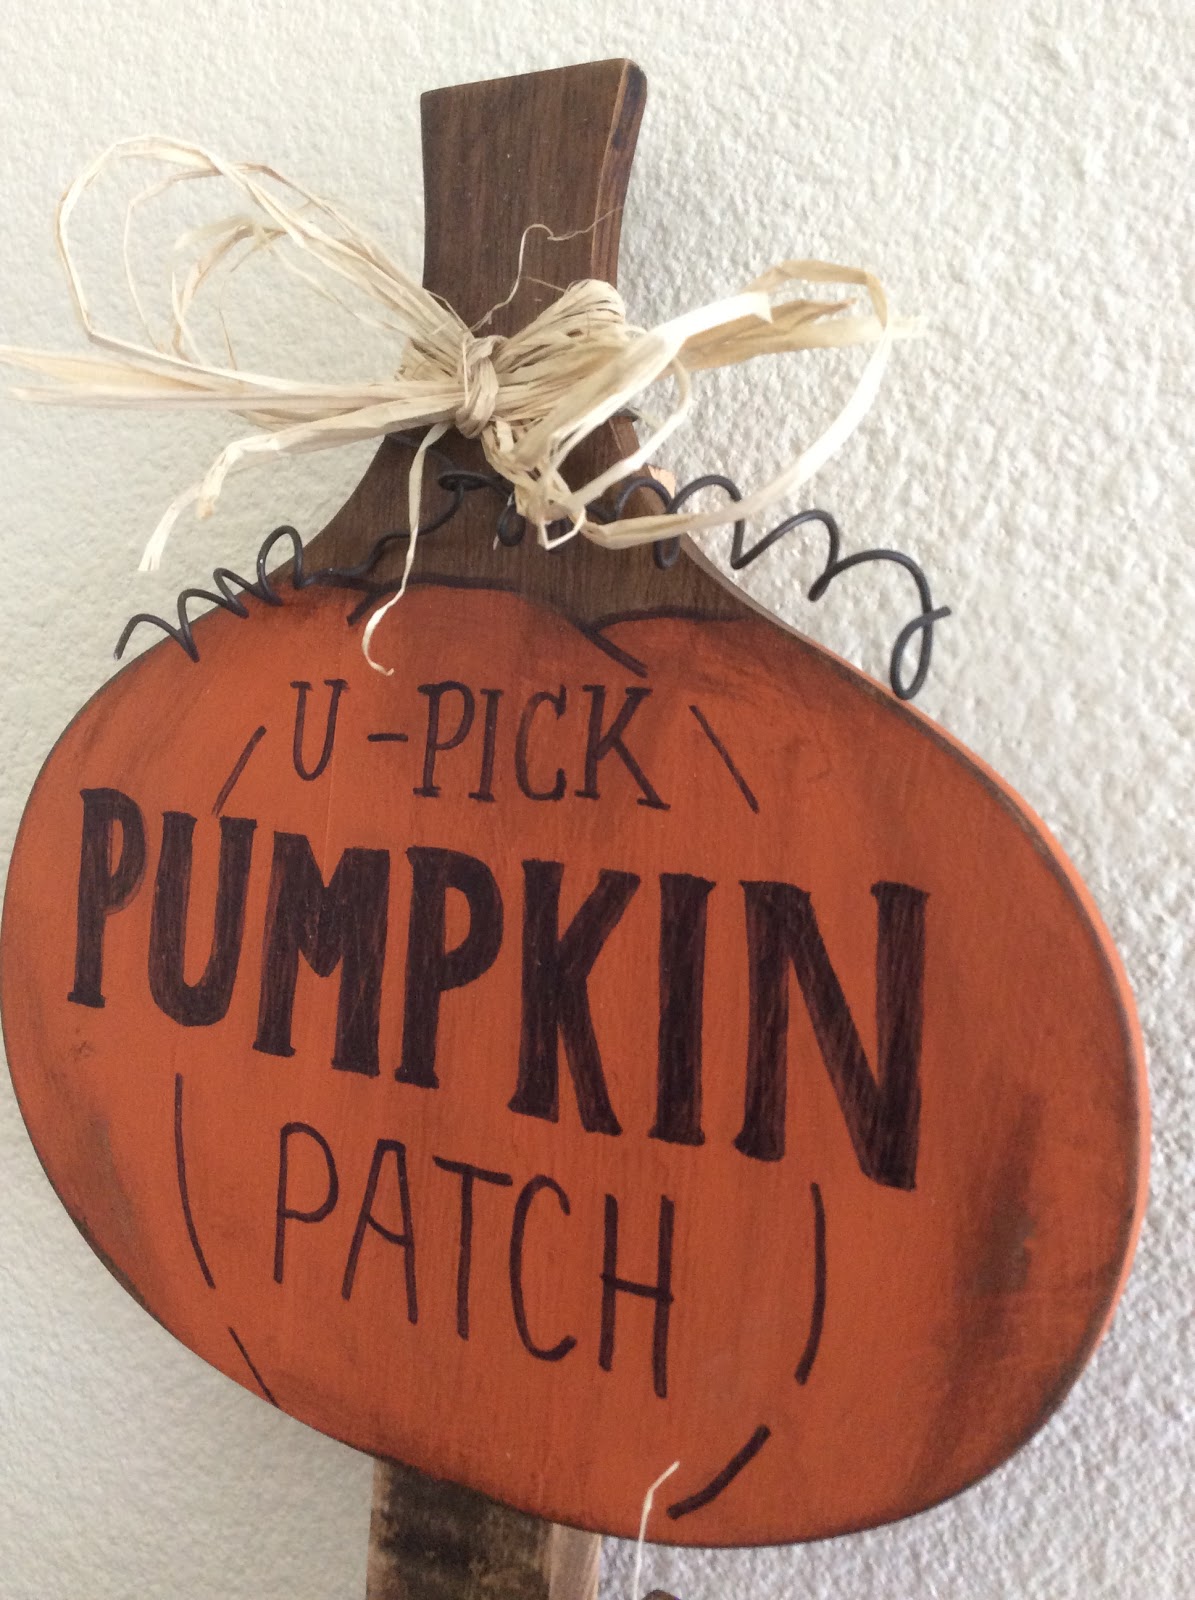
It will be probably be outside so it needs to be sealed.


I told you it was silly! 


Here's the sign along side my No-Sew Pumpkins !

Thanks for taking the time to hang out with me today-

Let me know if you are excited like I am to get out the pumpkins.

I hope you have a wonderful week.

You are the best!

xo Lisa S

Friday, August 16, 2019

Embroidered Lavender Sachet


Hello Friends!
 Welcome
I'm so glad you are here.


It's that time to collect the Lavender from my garden.

It's also time to start making some crafts for the Christmas Boutique Season.
These embroidered lavender sachets are always a  popular item.

I will share my shortcut with you...
I use the organza bags from the DOLLAR TREE.
They come in a few colors, I love the pale yellow/cream color.
The bags come 8 to a pack for one dollar.
3'' x 4''


I used embroidery floss in the color number 29 and 522

Cut a length of floss about 18'' and divide the 6 strands of floss in half.

Use the 3 strands and a needle to begin. 


I found it was easier to embroider when the bag was filled.


I used a running stitch stems and Daisy loop flowers.

 To get started just free hand the stems, then add leaves-


Then  stitch the flowers........ fill with Lavender buds and done!


Ways to use your sachets :
  • Use the sachet to scent your drawers and keep insects away. 
  •  A lavender sachet will work as a natural air freshener. 
  • Keep a sachet near your bed, the fragrance helps you relax. 
  • Give lavender sachets as gifts. 
  • Toss into the clothes dryer.
  • Put a sachet in your car, the heat will release the scent.
  • Tuck one inside your purse or suitcase.
When the sachet starts to lose the scent,
 just give the bag a little squeeze and it will become fragrant again.
The bags can be refilled when needed.


I have more to go......


When these are finished they will be set aside for
the Christmas Boutique.
 Do you start your Christmas crafting in the summer?
I would love to hear from you !
xo Lisa S


Sunday, August 11, 2019

Friday Finds- How I Test for VINTAGE BAKELITE

Hi Friends!

 On Friday I had some time to go THRIFTING !

I went over to GOOD WILL and saw these lovelies....so excited....75 cents each!


I knew right away they were Bakelite-


Looks like plastic-


 BAKELITE was the first plastic made from synthetic components.

 It is a thermo-setting phenol formaldehyde resin, formed from a condensation reaction of phenol with

 formaldehyde. It was developed by the Belgian-American chemist Leo Baekeland in

Yonkers, New York, in 1907.
  It was resistant to heat and would not conduct electricity, so it was a really good insulator—which

made it particularly useful in the automotive and electrical industries emerging in the early 1900s.

You can easily find examples on vintage lamps, toaster handles, and electrical cords.

Later uses were endless, but the most popular is still jewelry.


Note: Although it is thought to be safe, I am not crazy about the formaldehyde-

I would not let children play with this jewelry

because it ends up in the mouth!


I am by no means an expert in any way!

 I'm going to give you a few ways I use to test-

I hope this is helpful to you-


Test by sound-
 Bakelite has a distinct sound. Two bangles will make deep "clunk" instead of a light high pitch
sound.

Test by weight-
Bakelite has a dense feel and heavier than plastic or Celluloid.

Test by smell-
Yes, Bakelite has a distinct odor. Hold object in hand and vigorously rub the same spot with your thumb.
The warming of that spot will release a formaldehyde smell. It will also smell if tested in hot water.
Do not test in water if metal or wood are present. They could become damaged.

Test by sight-
Bakelite- You may say ''I know it when I see it''
Check for nicks and imperfections in carved areas- These are fine!
Pin backings are attached by screws or rivets  not glued!
  

Test by using more than one method !


You can also test with Baking Soda-


Simichrome polish is a popular to test.

You can discreetly check and item before purchasing- always ask permission.


Some say you can use 409 Cleaner to test.....


but....never tried it.


I prefer to use baking soda- It's cheap, safe, easy and I never have to worry about

damaging anything I am testing.


Just add about a Tbsp. to a bowl, and another bowl with a Tbsp. of water


You are also going to need a cotton swab- 1 per item to test.

Wet the cotton swab and dip into the baking soda.


Let's test!

Just rub the swab on the object-


Yes! The cotton swab will turn yellow if it's Bakelite.


My mixed knife collection- Yes!


Some kitchen gadgets- Yes!

Dice- Yes!


some buttons


An Engagement ring box


Yes!


I knew the radio was a yes!

It was a previous purchase at the GOOD WILL. 

It had power but needed some work.

My Dad found some old tubes and fixed this for me.

It works great!


Yes!


Sometimes you can find Bakelite hardware.

My husband refinished this Hoosier cabinet with milk paint we

kept the original hardware because it was Bakelite.

I am still missing one handle.....someday I hope to find one.


Yes!


 It's fun to test....but really who cares!

If you love it, it has value to you.

So have fun THRIFTING!

XO Lisa S

Sunday, August 4, 2019

How to make Faux Caramel Apples

Hi Friends,

I am already started to think about FALL!

It has been a very hot summer.

I know the Faux Caramel Apples have been around for years,

 but I make mine a bit different.

To start I use the green apples from DOLLAR TREE.

 I like odd numbers when decorating so I bought 3.


Pull out the stems and remove the tags.


For the sticks you can use, popsicle sticks, twigs from the garden,


paper lollypop sticks or thin dowels.


I had 3, 6'' long dowels on hand so I used those.


I pushed the sticks into the Styrofoam apples until only 4'' of dowel was showing.


I used Tacky glue to hold the stick in place.


Cover your work area with waxed paper.


You will need Glossy MOD PODGE- not the matte.


About 1/2 cup was plenty for 3 apples.


You will also need Acrylic paint to tint the Mod Podge.


My paint was .59 from Joanns' Fabric in the color.... CARAMEL !


I used about 1/2 a bottle or 1 ounce.


Note: The color will darken a bit as it dries!


I used a disposable plastic bowl and plastic spoon to mix.


At this point you start to say...yum...


The next step needs two hands...so no pics !


Holding the stick in one hand, and the spoon in the other- spoon your ''caramel '' over


the apple at an angle over the bowl and let it drip downward.


Continue all the way round the apple - slowly.


The consistency is not as thick as real caramel.


The spoon works so much better than a paint brush!


I like a little apple to show on top and puddle at the bottom-


you may prefer to have more apple show at the bottom.


Try not to touch, set on wax paper and leave alone for now.


If you see any tiny bubbles you can pop them with a toothpick!


After about an hour I was ready to add the ''nuts''.


All of the apples I see others make use corn cob small animal bedding?????


There was no way I was going to buy a huge bag for just the tiny bit I needed-


You all know I'm cheap!


So I use....Steel Cut Oats...I think it looks even more like chopped peanuts than the corn cobs.


Put some oats on a plate.


Pick up your apple by the stick and set in the oats.


Tilt apple and sprinkle near the base with your free hand.


Set back down on a clean piece of waxed paper.


Leave alone for another hour.


Come back to check on your apples, as they dry they look less opaque and more shiny!


When dry, you can set each apple in a cupcake liner.


You can change the liner to match any holiday!


See the color change?


A side view of the apples with vintage Trick or Treat Candy bags.


These apples could fool anyone.


Perfect for Fall staging!


I added some raffia bows and put them on a tier tray that I made

using a vintage rolling pin, cut and a pie tin and pizza pan.


Make sure your family knows these are just for decoration......


They are making my hungry-


If you don't want to make your own, here's a link to get 4 of my apples
already made, each in a cellophane bag for $12

https://www.ebay.com/itm/363105393005


Okay my question for you....

Do you like your Caramel Apples with or without nuts?
Thanks for visiting!
xo Lisa S

Faux Tin Tile Bunny

Hello My Friends!  Most of the Craft and Dollar Stores have some chunky cut outs for Spring! There are so many ways to decorate these. I use...