Tuesday, May 29, 2018

How to Paint and Stencil a Silver Tray

Once in a while I come across a YARD SALE that has a box marked FREE.
 
Please tell me I am not the only one that just CAN NOT resist
 
looking in the box with hopes of finding some amazing treasure inside.....but
 
no it's the usual suspects. Missing pieces of this and that. I get the strange look from
 
my dear Husband who tries to talk me out of bringing home my find.
 

This heavy Stainless Steel Tray or Charger was in the box and it came home with me.
 
I wanted to see if I could bring it back to life with some chalk paint
 
and a stenciled design.
 
I wiped it down with a clean cloth and got out the paint and the wax.


I only needed 1 coat on the top and bottom.
 
I used a damp clean lint-free cloth to wipe over the high
 
spots to remove some paint for an aged look. If you take off too much you can
 
go back and paint again. It is impossible to make a mistake.
 
 
After my plate dried I decided I wanted to stencil the center of the
 
plate, using just a small portion of one of my stencils.


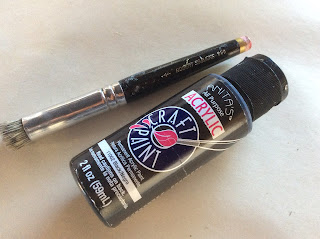
I used BLACK Acrylic paint with a dry stencil brush.
 
Use only an UP and DOWN motion when stenciling.
 

 After the stenciling dried I lightly sanded over the lettering.
 
 
After you have stenciled your design let it dry thoroughly
 
now you can add your wax finish with a soft cloth or wax
 
 
 Clean your stencil and brushes with soap and warm water.
 
 
Note: This plate will not be in contact with food. For decorative purposes only.


 This was a very quick and easy project.

 
I hope you enjoyed your visit! I loved having you stop by!
 
xo Lisa S

Friday, May 25, 2018

Stenciled Shopping Bags and Feed Sacks


A friend of mine invited me to share her booth at the FLEA MARKET this weekend.
 
 I thought it would be fun so I am running around gathering up items to sell.
 
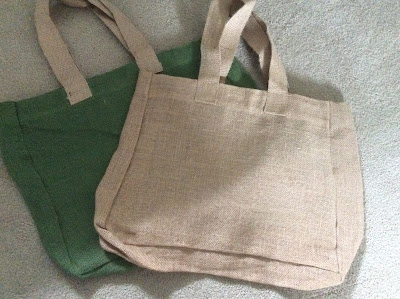
I have some burlap bags that I purchased from the 99 cent Store.
 
They are large and sturdy with a gusset and reinforced handles.

I could not, nor would I want to make these for 1$ !
 
I thought I would stencil them.


I taped the stencil in place.
 
You will need to put a piece of cardboard inside the bag to give yourself
 
a flat surface to work with AND to prevent bleed through. Burlap has a large weave.
 
Using white acrylic paint and a small stencil brush, I started to stencil.
 
UP AND DOWN ONLY, and a dry brush.


Use your non-painting hand to hold down the stencil as
 
you move from one spot to another. It's best if you don't jump around
 
but finish one area at a time.


Remove stencil, gently wash stencil with soap and water.
 
 
I was able to make 6 in just a few minutes.


And then a bunch more!
It was fun-
 
 
I will be bringing them to the flea market, they make great shopping bags.
 
I hope you have a wonderful weekend.
xo Lisa S


Wednesday, May 16, 2018

DIY Blanket Ladder

Hi Friends,
 
When I made the Hanging Patio Ladder last week I had enough scrap
 
wood rung pieces to make another Ladder.  I only needed to purchase the 2 side pieces.
 
I think everyone but me has made one, but I thought I'd share my version.


 I used (2) 1.5'' x 1.5'' x 8'  Furring strips   -$2.00 each at Home Depot
 
CUT TO :
2 outside pieces- 6 ' each
 
6 rungs or cross pieces- 17'' each
 
I used a staple gun
1st cross piece 3'' from top
next pieces are 12'' apart


Use a level 


 Lightly sand, I used the side of a hammer to dent and age my ladder.


My favorite  BRIWAX  in Dark Brown and a soft cloth


Stained and sealed. Let dry over night.
 
Bring inside, add some blankets! 


This is where it stayed for now. 
 
 
 I was very pleased with how it came out. You know me I was changing it and
 
moving it all over the house.
 
Thanks for letting me share this scrap project with you.
 
Have a wonderful Blessed day!
xo Lisa S


DIY LIBRARY CARD CATALOG CABINET


 Here it is.....


Maybe I should have warned you......This started out really needing some help.
 
 This thrifty find was $1.00


Cleaned with a damp cloth. Sanded lightly. 


 I used Chalk Paint, 2 coats covered that RED
 
 
The cabinet
 
* With a cabinet like this you can also flip over so the top is the bottom of the cabinet,
 
if it is in bad repair. 


The original fronts......turn all the way around


 The new fronts..... are  the old backs!


Here is the hardware that I had, it is a little large but it will work
 

I made a paper pattern of the drawer front and marked each drawer
 
where I will drill the holes.


I returned the drawers to the cabinet.
 
Sand  lightly for an aged look, wipe down to remove dust.
 
Wax or Seal before you add the hardware.


 I drilled all the pilot holes.


I used a tiny Phillips screwdriver and attached the hardware
by hand. That took a while but no mistakes...Thank goodness.


 SO.....If the drawers are in good shape
 
and the same size, they can be flipped around!


Here is the old front!


 FINISHED and ready to take some pics!


Tell me what you think. 
 
 
THANK YOU for visiting !
xo LISA S 


Wednesday, May 9, 2018

DIY Hanging Ladder for Patio plus Solar Light Jars


 Hi Friends !
 
 
I really wanted to add some lights over our backyard table.
 
My Dad made the table and I remember using it when I was a little girl.
 
When my Husband and I first got married, we had the biggest yard in the family
 
so we  got the table and have had it ever since.
 
That makes me happy because everyone wants to come to our house for Holiday's.
 
We love to BBQ and hang out on the Patio.
 
 It is a huge 8' Farmhouse Style Picnic Table. I have been trying to find an old ladder to
 
hang over the table but have not been able to find something I liked ..... time goes by  
  
and I am thinking....just make one.
 
It seemed fairly easy and inexpensive.


We are off to Home Depot for supplies-
 
THIS WAS MY ORIGINAL PLAN 
 
2 pieces of 1.5''x 1.5'' x 8'  Furring strips $ 2.00 each
 
(carefully pick pieces that are straight )
 
both cut by Home Depot to- 6'
 
with the scraps from the first cut- you will have 2 pieces 24''
 
cut those pieces to 12'' now you have 4 rungs 12'' and 2 - 6' long pieces.

                                            THIS WORKS OUT MATHMATICALLY   
 
perfectly!
 
BUT
 
I over bought and changed my mind on the size once I got home!
 
 
Now I have enough to make a second ladder...stay tuned next week will be
 
a Blanket Ladder with scraps from this project.
 
Disclaimer: I only spent an extra $2.00 so I'm good with that.


I had my Husband help with the power tools.
He used his electric staple gun.


We used a level to make sure the rungs were right.
 
 
 12'' pieces and 12'' apart


We used Eye hooks at the outside corners.
 
I bought 2 Chain plant hangers from Dollar Tree.
 
 
I used pliers to attach to eye hooks.
 
Add held it over the table to decide on length needed.
 
 
I used my favorite stain. 
 
 
.
Dark Brown BRIWAX-
I love this stain because it is a paste and a wax
only 1 step !


I bought S hooks at the Dollar Tree
 
 
And painted them black


NOW THE LIGHTS!
 
Dollar Tree again..... How ever many you like.
 
Remove the stake-  pulls right off
 
I used pint size, regular lid rings, some wire and pliers.

I like the Jewel Cut Jelly Jars, they give off a pretty design.


I could only find black and after I was finished I decided they would look
 
better silver or grey to match the rings. I popped them out and spray painted them grey. 


Made wire loops to hang 
 
 
wrap around the jar and slip off 
 
 
 attach and slip back on
 
 
 I used the S hooks and attached to ladder.
 
 
Here are the jars with the lights painted grey 
 
 
In the afternoon
 
 
At Sunset


I made 6 solar jars and that really gave off a lot of light.
 
I have just enough scrap wood left to make a Blanket Ladder this weekend.
 
So that will probably be the next post.
 
Sorry this seems a bit long, I appreciate you staying to the end !!!
 
xo Lisa S


Faux Tin Tile Bunny

Hello My Friends!  Most of the Craft and Dollar Stores have some chunky cut outs for Spring! There are so many ways to decorate these. I use...