Tuesday, May 28, 2019

Recycled Spice Tin


Hello Friends,
I hope you are doing well !
 
I have been busy at work and I have missed you all-
 
There has been no time to be creative.
 
Today was my first chance to visit a thrift shop....all I found were these spice tins.
 
They are not that old but I liked them.
 
I don't know if I shared this before but I am a lover of TINS !
 
I used a bottle cap opener to pop off the lids.

 
I added about an inch of sand.


Then filled the tins with potting soil.


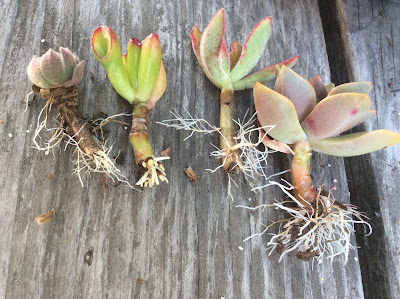
I have some small succulents, that I started in peat pots.

 
They have started to root.


I planted the succulents in the tins.


That's it !


Add just a tiny drop of water.


JUST A REMINDER: Be careful, over time these will rust.
And may leave marks on furniture. 


                                                      Here are just a few of my spice tins.

 
My favorites are the vintage Schilling and  Ben-Hur spices and any coffee tins.
 
 
Share with me in the comments any of your unusual collections !
 
Thanks for stopping by-
xo Lisa S


Sunday, May 12, 2019

Stenciled Patriotic Envelope Pillow


Hi Friends!
 
We are going to stencil a pillow cover. 
 
If you are making your envelope cover you will need a piece of fabric 19''  X  42''.

I love to use drop cloth material.


Hem edges.


Overlap by 4'', with stitching facing out.
 
Pin and stitch sides.  Pillow should measure  18 '' on side.

 
Turn right sides out. 
 

This is the back side of pillow with opening.


This is the front of the pillow.
 
Iron both sides to remove wrinkles.


I absolutely love my Inspired Barn Stencils!
 
This stencil can be used so many ways.
 
 I decided to go with a traditional patriotic color scheme.


I used Acrylic paint. Since this pillow cover can be removed I can safely

hand wash if needed.

 
The paint colors I used were Apple Barrel- Black, Bright Red, Pure Gold
 
Craft Essentials- Navy
 
 
Painters Tape and a stencil Brush


I put a piece of thick cardboard inside the pillow cover to
 
 make a flat surface for working as well as a barrier in case the paint goes through by mistake.
 
 
On my pillow the opening is turned laterally, with the overlap top over bottom!
 
First I measured for placement. I had about 4" from seams to outer ring.
 
Tape in place.


I started with red only because I was sure about my choice for the stripes.
 
Remember when stenciling... not too much paint!
 
Then painted the ring.


Let dry a bit-
Then I painted with Navy.
Tape off tight areas....I also use the fingers from my other hand to block the paint brush.


I taped off the flag so I could paint the pole- Gold.


This is how is looked originally.


One of my pet peeves is dirty stencils!
 
They will last a lot longer and give you sharp lines if you clean them after use.
 
 I put the  stencil in a deep utility sink, run warm water.
 
Be gentle and use a soft brush or your fingertips to remove paint.


So much better now!
 
Hang to dry.
 
 
Now back to your pillow, it is probably dry .
 
I am not sure if I liked the way my flag turned out.
 
The white stars did not show up well on the pillow.
 
So I had another idea...I taped off the flag again and painted over the stars.


After your stencil work has dried set the paint by using a

clean cotton cloth on top of stenciled pillow and a hot iron.


Then I went digging through my jar of white buttons.
 
I have all my buttons separated by color, don't you ???? :)
 
 
I found 13 of these......


13 stars for 1776!
 
I liked it better -


Now you can see the stars.
 
 
Fill with an 18'' or 20'' pillow form or one of your own pillows.


Since it is an envelope pillow it can be changed often but we have
 
Memorial Day coming soon and then......the Fourth of July.....Flag Day...

lots of opportunities to display your pillow.


This type of pillow can be used on the porch or patio and is easy to store

once you remove the pillow form.


Thank you so much for visiting today!
 
xo Lisa S


Friday, May 3, 2019

Easy Nature Walk Moss Terrariums

                                                                                                                                                 
Keeping a low-maintenance terrarium is a great way to add something living to your space,

especially if you lack time or a green thumb.


An enclosed terrarium, one with a removable lid or narrow neck,
 
provides ample humidity and creates its own tiny ecosystem.

It is well suited for plants that are compact and thrive in high humidity, like moss.
 
 I admit I am obsessed with moss!
 
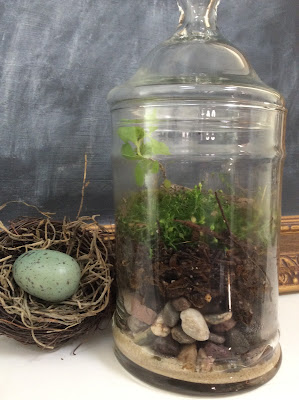
I used these old jars I had on hand.


You can also add tiny sticks and some decorative rocks or miniature figurines,

the possibilities are endless. I added acorn caps filled with a different variety of moss.


Let's take a little walk-


When you go on your nature walk, bring a small container to collect your moss.

This way you can store it until you are ready for use.


 Pinch the moss so you can bring some soil attached from the underside.


I purchased this set of tweezers at the Dollar Tree.
 
They were helpful and you could use them for other craft projects......
 
but optional.


 Before adding potting soil to your terrarium,
 

 spread a half-inch layer of gravel at the bottom of your

 planter to create drainage. You can use any natural material you find.
 
I had some sand and pea gravel. 

 
         A moist bed of potting soil with some broken twigs, dried leaves and bark.


When you add your potting soil, lightly press down to remove any air pockets.


I filled an acorn with moss.


Make sure to place your terrarium in a spot that receives indirect light and rotate.


Do not over water, remove lid occasionally to cool and dry out if needed.


Enjoy an early Spring nature walk and tell me what you find!
xo Lisa S
.
 

Sewing Pattern Journals

  Hello my friend ! I'm back with another Junk Journal. If you like thrifting like I do, you probably find patterns available all the ti...