Friday, March 27, 2020

Springform Pan Spring Planter

Hi Friends,


I'm going to make this thrifted Springform Pan

into something pretty to hang on the  wall for Spring.


For the Planter

You will need :


A Springform cake pan-   my pan is 10"

Rope scrap or chain 30''

2  heavy duty type picture hanger hooks

Any type of  Super Glue Gel


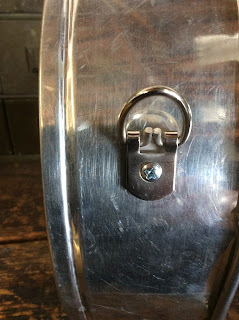
I marked the sides of the pan where i wanted the hangers.

Then I used Super Glue Gel and tape until the glue set.


This pan was thin and I was able to use

the sheet metal screws that came with the hangers for extra hold.


I measured the pan and cut in half with tin snips.

The edge is sharp, be careful!

I used a hammer to flatten the edge and that helped.


I glued one half to the outside rim.

Make sure your hanger pieces are level and facing upward.


The tape will hold it in place.

Add a little weight on it if you think it's needed.


Then glued the other side.

There's your pocket planter.


I had a scrap of rope, about 30 ''.

Just looped it through the hooks I added and tied  knot.

The rope was from Dollar Tree.


This floral foam block came from

The Dollar Tree.

Then I used hot glue to cover the foam with Spanish Moss


I added  some artificial greenery to the planter.

It really did not need much.

I found the Baby's Breath, Boxwood and Lamb's Ear at

 Walmart for $2 or less per stem.


I had this faux nest in my stash.


It was easy to put together.


I used 2 small magnets to add a sign to my planter.

No need for glue!


The Dollar Tree has been putting out these galvanized sets each season.

There are three in a pack- well worth $1.

I've collected Fall, Christmas, Valentines and Spring.


WELCOME was in the Fall pack.

I painted this sign piece white, so it would

stand out against

the planter.


I can change the sign over and over-


I went through my cans of  spray paint and found, Rustoleum Peek-a Boo Blue.

"Happy Easter" came from the Dollar Tree,

it was in the spring set along with the word -"blessings".


Tell me what you think.

Mr. FreshVintage hated this idea at first......

then it  started to grow on him.


It's so nice to have you here!

I hope you have a wonderful week.

xo Lisa S


You can see more baking pans as planters here.


Sunday, March 22, 2020

How to Make Vintage Hankie Bunnies

Hi Friends!

Do you remember making Hankie Bunnies?


If you forgot how or maybe don't know how.....

let's make some now!


Start with a hankie-

If you don't have one, yes you can use a square piece of thin fabric.

You can even make the bunnies with dinner napkins.


Fold across in a triangle, pretty side out.


Roll up to the point


That little tip will be the tail.


Fold in half


Tie a knot


Pull both ends outward from center knot.


Turn on side and fluff.

Spread ears, the body is a loop and tail points up.

Oh how sweet!


Fill with chocolate foil egg!


Warning:

You can't make just one-

 They multiply fast!


Let me know if you made these as a kid.

xo Lisa S

Saturday, March 14, 2020

Peat Pot Gift Baskets


Hi Friends,

Decorating a Peat Pot has been around forever !

They make great little gifts on their own filled with candy.

I like to take them to the Vintage Market filled with paper shred or moss.

Customers can use them as a gift bag and fill with a  small purchase.

The pots are inexpensive and fun to make.

Update : Vintage Market cancelled due to Corona Virus! 


The pots can be found easily this time of year.

Maybe you have some on hand-

I found my pots at Home Depot and Dollar Tree.

I used 3 sizes, 4" high,  3 1/4" high, and  2 1/4" high.


I left a couple of pots natural

and


I used acrylic paint to cover the other pots inside and out.


The edge was painted white or gold and I added clear or gold glitter.


Here's some ideas to decorate your pots.


I made copies of the pictures I wanted to use.

You can shrink and size the picture to fit your pots.

( I used colored pencils to color the rabbit ears)


I have these scissors that give a perfect decorative edge to old photos.


I used Matte Mod Podge and brushed on the back of photo.


After the photo dried, I brushed Mod- Podge on the front of photo.

Then added a wire handle to the pot.


Then added a scrap of ribbon and crinkle shred paper or Easter grass.


I painted the edge of this pot pink and added clear glitter,

some ribbon and a flower.


I added clear glitter to the edge of the pot below,

ribbon and a broken vintage earring.


This pot was left with  natural color.


This pot below was painted white and added clear

glitter to the edge.


On this pot, I added gold glitter to the edge, and gold paint

around edge of the postcard.

I found the gold foil chocolate eggs at the Dollar tree.


I also used napkins to decoupage a design onto the pots.


These cocktail size napkins came from Dollar Tree.


The napkins are 2-ply and you will need to separate the layers carefully.


I always tear the napkins instead of using scissors

because the edges blend together more naturally.


Use Mod Podge and a brush to cover pots.

These pots below were left unpainted.


I added moss and a wire handle.


These pots can be tucked into

your tiered tray decorations.


The ''Sweet Treat'' pots went so well with my other

Easter Decor.


I love projects that cost just pennies !

Thank you so much for spending time with me today-

xo Lisa S


Vintage Scotch Tape TINS -

  Make great Candle Coasters ! Merry Christmas ! Some mischief-makers have had a hold on my computer...??? Unfortunately it wasn't these...