Wednesday, April 27, 2022

Vintage Bottle Stoppers

 Hi Friends,

This past week I was slowed down by an

extreme case of VERTIGO !

If you have experienced it , you know what I mean.

Now I can get back on the computer-

I'm trying to get ready for a craft show in a couple days.


So last minute I put together some 

Bottle Stoppers and I thought I would share

them with you!


I get so excited, sometimes I forget to take pictures.

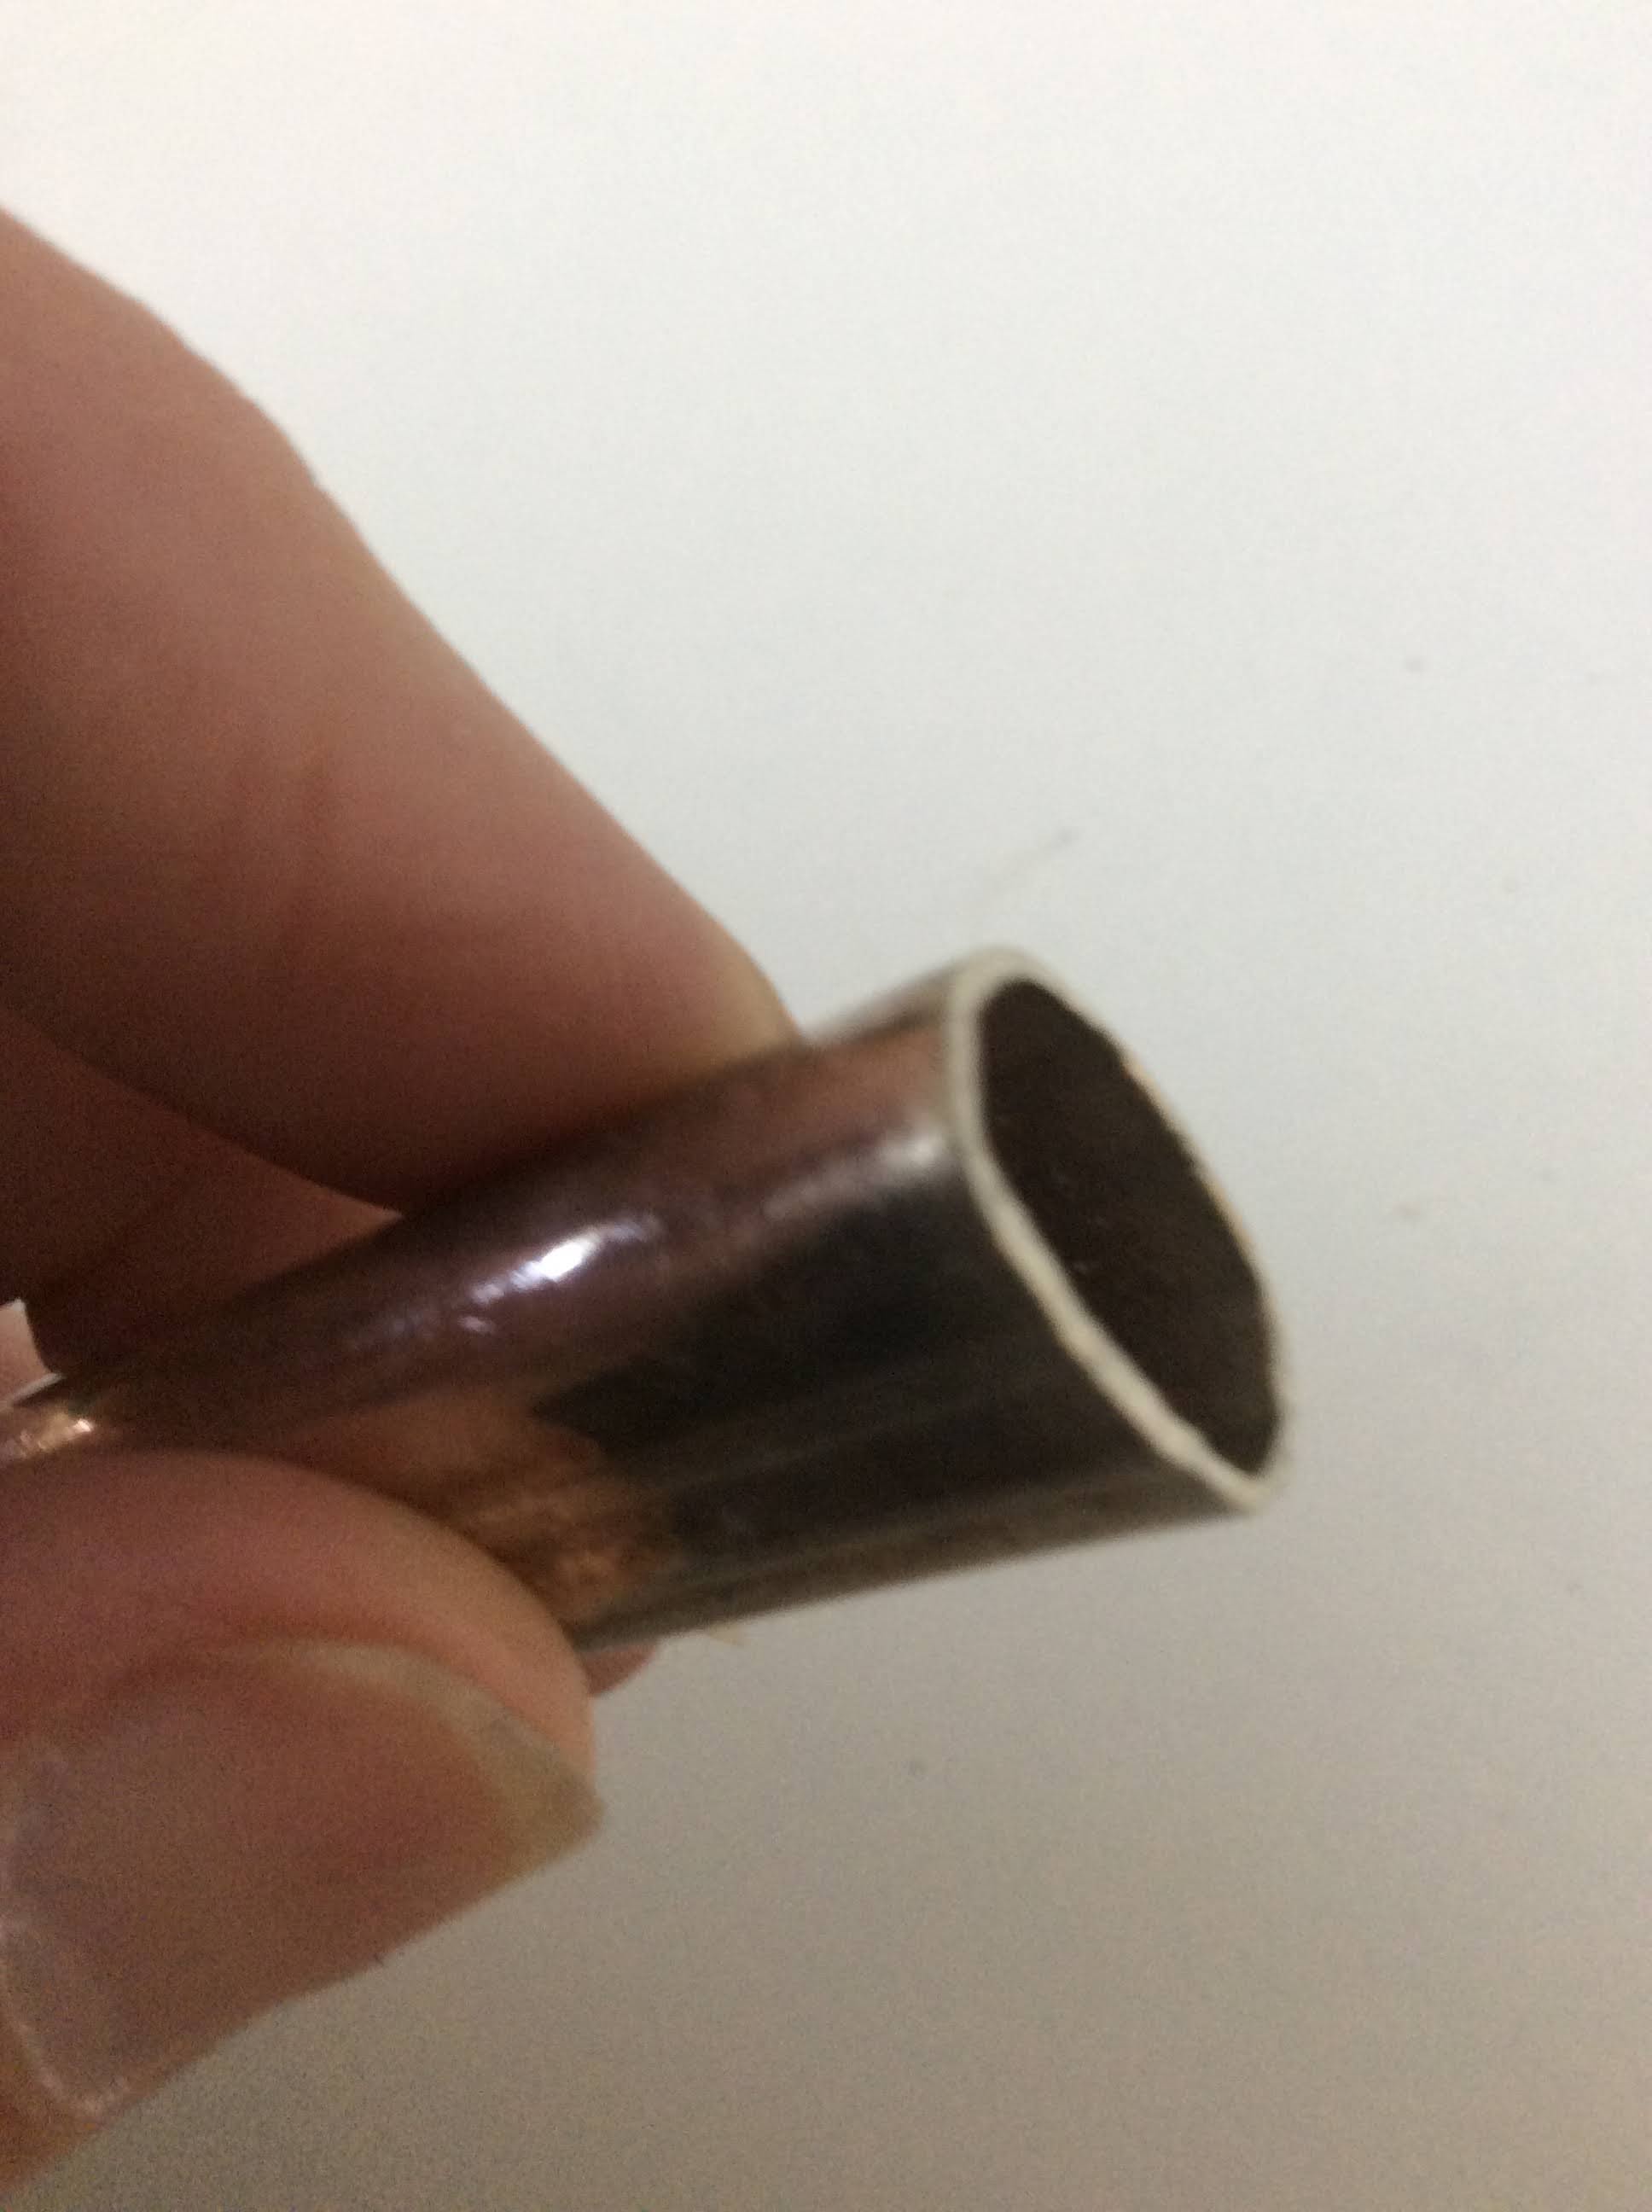
It started with this stopper -

The top was easy to remove.

Some needed to have a screw cut to attach the knife handle

and some stoppers have a post.

I prefer the stoppers with a post.
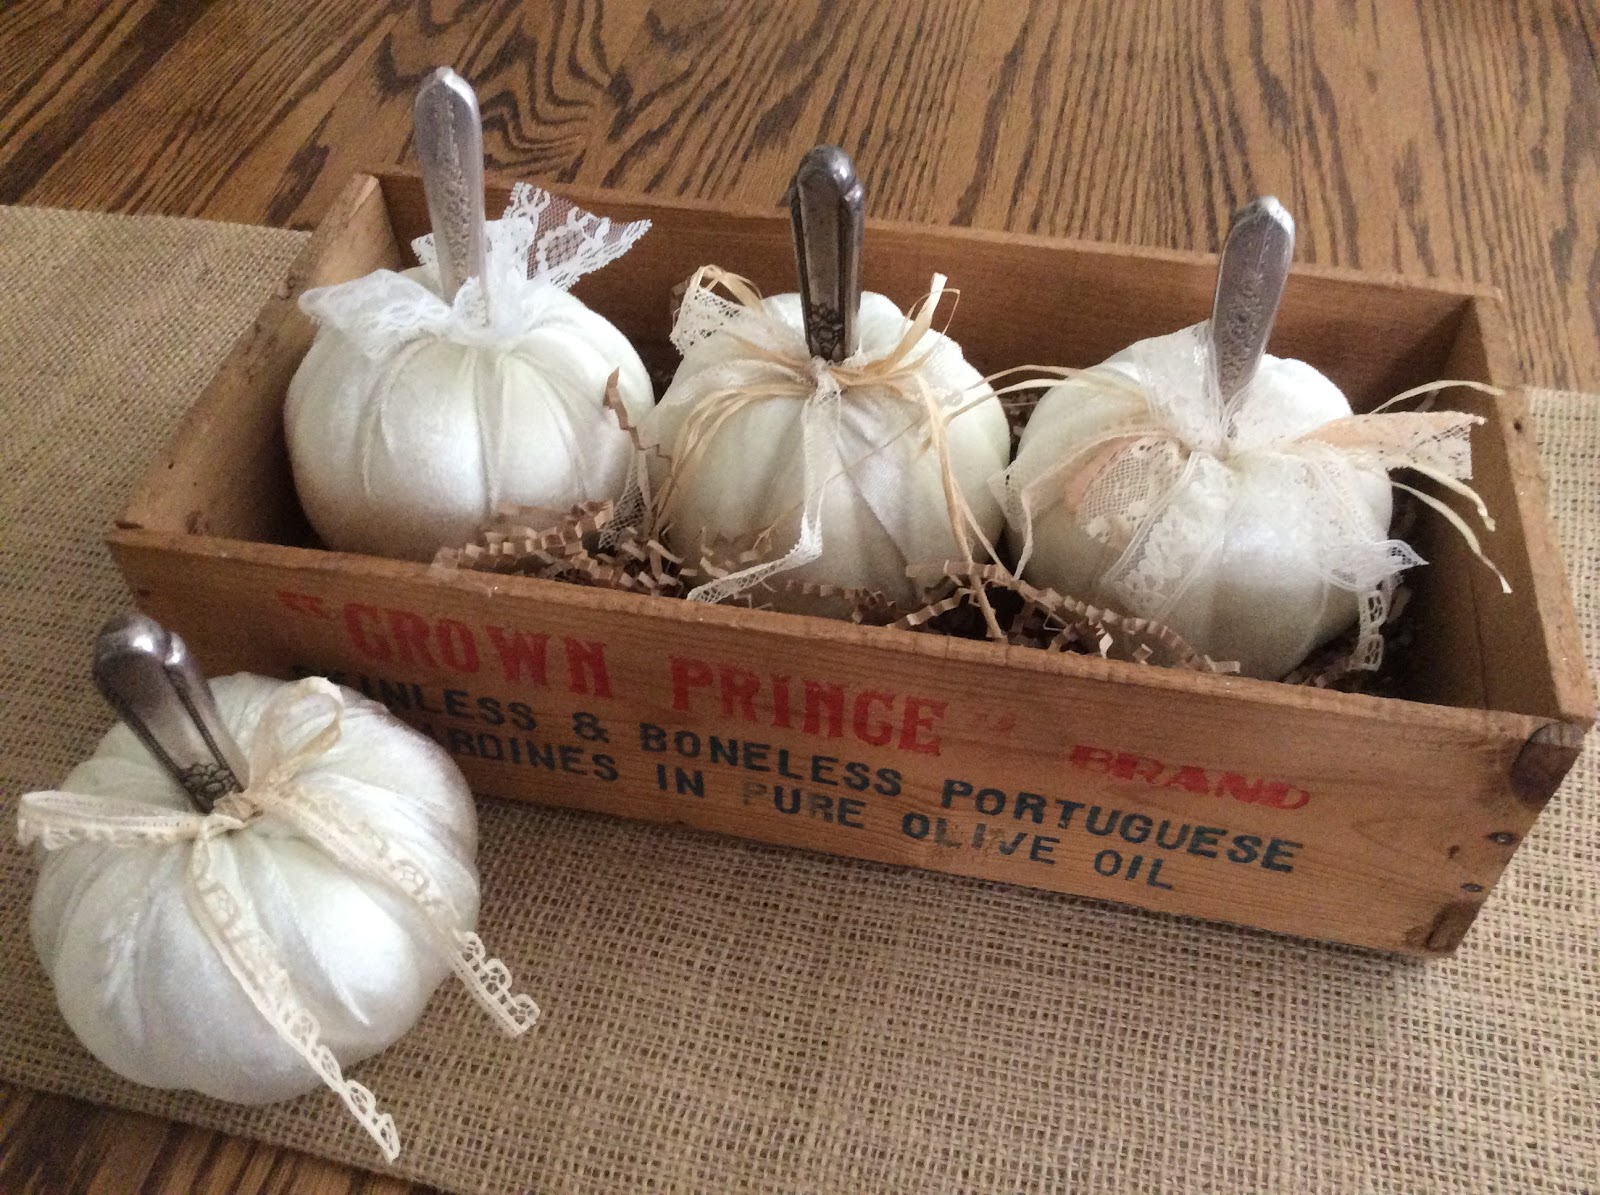

and a knife


It is easy to find knives at thrift shops.

The knives are usually inexpensive.

I use a vise and a soft cloth to hold in place while I cut.

I used a Dremel tool to cut and sand the ruff edges.


Making sure the top is level.


The handles were a tight fit on the screw and the post,  no other

fixative was needed.


Then I polished the handles.


The stoppers can be used on an  olive oil bottle-


They can fit a wine bottle or in my case sparkling cider!

Just pretty for a party or wedding.


I think these would make a nice gift.


I used more knife handles on this blog post-

Pumpkins


Have a great day!

Thanks for the visit.
xo Lisa S


Monday, April 11, 2022

Add -On for a Wood Bead Garland


Hello Friend!

A couple years ago, I shared

 how I made a Bead Garland with tassels.

I recently started attaching other wood pieces. By tying them on to 

the same bead garland , it can be changed over and over

for different holidays and occasions.


I found this chunky wooden cross at the Dollar Tree.


I painted the cross with white chalk paint

 and sanded the edges.

Acrylic paint would work just fine.

I tied a long piece of jute at the top.


I traced around the cross and free-handed my verse.


I just used a find point Sharpie


Find the center-


Tied with a bow, if I want to change it again.


I collect old, tattered and brittle small Bibles :)


I have to admit,

I made this for Valentines'....and I'm leaving it out for

EASTER and sharing it with you now.


Blessings to you!
xo Lisa S


Tuesday, March 29, 2022

Mod Podge Transfers on Chalk Painted Suitcase and Seed Box


Hello my friend !

I was invited to join a boutique on May 1st. ,

that will be part of a GARDEN TOUR.

I will be set up at one of the homes on the tour.

SO.....I have been going through my things looking for some to take with me.

 Last week I say this train case my favorite thrift shop

The inside looked so bad-

the lady told me ''We can't sell this just take it if you want it"

Yes, please!

No, I did not take a picture of the inside-

nasty stains from perfumes and lotions.


I should have taken the picture of my husbands face!!!

Priceless :)

Chalk Paint can fix it-


Chalk Paint can fix it-


Here's the first coat


The second coat covered the stains and the green cloth. 

I used some white trim that I had to cover the
 
edge of the mirror.


It had the key so I pinned it inside on a doily.


I was pleasantly surprised the the paint even covered up 

the perfume smell!

Two coats on the outside-


When the case was dry I looked for a label.


You will want to print label in reverse-


Use an INK JET printer and regular copy paper


Here it is in reverse to make it easier for you.

Save and make a copy  


The label came from The Graphic Fairy.


Trim to fit.

Cover design with a coat of MOD PODGE.


Press firmly and leave it alone overnight !


Come back now and wet the paper-

You will see the design showing through-


Start to gently rub off the paper with your fingers.


Keep rubbing-


Until all the paper is removed.


Easy as can be!


The other box was wood, plain and painted black.

I painted it white and added a label-


To protect and seal your transfer, use spray matte sealer or clear wax.


I have a few more upcycled suitcases here   and here.


Thank you for your time!

I appreciate you so much, leave a comment and say hello-

xo Lisa S


 Update: Sold / Sold


Sunday, March 20, 2022

Tennis Anyone? Repurposed Tennis Racket Frame into a Flower Press


Hello Friends,

Back in the day....

we used these wood frames to keep our WOOD Tennis Rackets from warping.

I know you see these all the time at the thrift stores- right?


I thought the frames looked a lot like a flower press-


I had a crazy idea to make one!

I picked up a couple of racks for a buck-


Here's an adorable little tennis player for you !


The wingnuts do not come all the way off.


Trace around the outside of frame and make a pattern

for your cardboard.


Cut out the corners.


I cut 4 pieces of cardboard.


I folded my paper in half so it would fit in my frame.


Then I went out in my garden to pick some flowers.


I put the folded paper with flowers inside,

between the layers of cardboard.


Then tightened the wingnuts on the frame.


As tight as possible!


Then set aside for about 4 weeks.


Then loosened the wingnuts to slide out the cardboard.


It worked!!!!!


I collected Calendula, Lavender, Salvia, Cilantro leaves,

Freesia, Geraniums,


Nasturtiums and leaves, Forget-me-nots, Alyssum and

Marigolds.


This flower below left a stain on the paper,

which I love!

I will save this paper for a future letter or page in a junk journal.


I used a bit of glue to hold the flowers in place.

I was able to make a pretty piece of artwork with this thrifted picture frame.


Thank you for visiting with me today!

xo Lisa S


Repurposed Yogurt Jars

  Hi friends, I hope you are doing well! This week I have been busy planning a party- I have a small collection of these yogurt jars. I deci...