Friday, November 24, 2023

Vintage Button Trees

Hello my friend!

Thanks for stopping by-

I know I'm not alone when it comes to collecting buttons.

It just happens!

When I was a little girl, I loved playing in my Grandmas' jar of buttons.

So many unique shapes, colors and sizes.


Let's make some easy ornaments

using buttons.


Things you will need:

You will need a few buttons, about 12

in graduating sizes for the tree-

plus about 4 small buttons approximately

the same size as each other to be

the tree trunk base


1 piece of  24 to 26 gauge wire, 12'' folded in half

and 

wire cutter/ pliers


Lay out your graduated buttons


Start at the base of the tree.

'thread' the button through the wire.


Continue up the trunk-


Begin your tree with the largest button

and work upward.


If your button has 4 holes-

thread wire across as shown.


Keep adding buttons

until you are happy with the height of your tree !


My trees are short and fat!


Tighten and twist a couple times using pliers.

Cut 1 wire, make a loop

with the other wire end .


Wrap the wire around the base over the cut wire.

Use pliers to tuck in sharp ends.


Easy!

Now you have some ornaments to

hang or give as gifts-


Add ribbon if you like-


The trees were big hit at my craft show!

I hope you have a great week!!!

xo Lisa S


Note: I also made Snowmen- But I sold out

and only had one picture.


Tuesday, November 21, 2023

Make your own Victorian Paper Ornaments

Hello My Friend!

Today I wanted to share with you some

 easy to make ornaments.


These prints are generously supplied by The Graphic Fairy

Save and size to fit .


Things you may need-

small scissors for detail cutting

An Angel face cut-out with

card stock backing,

 cardboard cut out shape or Star Tree Topper

 Mod Podge, chenille stem /pipe cleaner, hot glue.

something fluffy- like yarn, tulle or feathers-

and glitter-

white glue for glitter


I pick up these small glass jars when I see them !


I love this yarn- I think it was from Michael's Crafts

It's called Glitter Eyelash-


I backed my print with cardstock.

Fussy-cut all the details of your angel.

On the back, bend a pipe cleaner/ chenille stem along the outer edge.

Attach to cut out using hot glue.


The chenille stem  gives some dimension to the ornament. 


Then I added a layer of fluffy yarn.


I like to show you the back side so you

can see what's going on-

I added some tulle behind the wings.


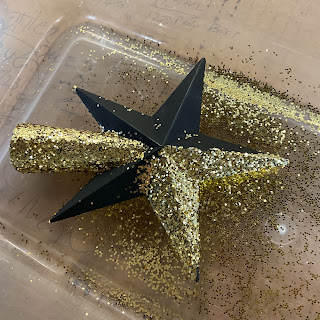
These plastic toppers are easy to find-


yes, I found these at Walmart yesterday!


You can paint or glitter to your liking.


I used mod Podge and glitter.


I try to confine my mess by sprinkling the glitter

inside a plastic shoebox.

Afterwards the extra glitter can go back in the canister.


Glue angel to the center of the star.


Here's the backside.


This angel was made the same as the other.

I took a glitter chenille stem and followed the curved

edges, then glued in place with hot glue.


The chenille stem give support to the delicate details.


This topper was already covered in a dark silver glitter

and I liked it-


These smaller ornaments below were just made

with card board from cereal boxes.

I cut them and covered both 

sides with Mod Podge and glitter.


I had these sepia colored angels in my paper stash.

I couldn't remember where they came from. 


I hope you enjoy these sparkly ornaments!

xo Lisa S


Monday, November 13, 2023

Very Little Golden Book Christmas Ornament Tags

 Hello my Friend!

Last week I mentioned that I had an idea....

and I hoped it would work.

This is how I made these -Very Little Golden Book

ornament tags. 

Made with scraps from my previous post.


I used the front cover -

 for this project

Upcycled Perpetual Calendar

Now I will be using the back cover.

Some of the newer books have these mini

pictures on the back.

I tore a thin layer of cardboard off the back so I could

cut these out easily with scissors.


Here they are-


So cute at just about 2'' high!


Just need a scrap of thin cardboard the same size as the cover.

This will be the mini books' back cover.


You will also need 

a scrap of card stock for inside the book.


Flip the cardstock-

Glue cover pieces to the back side of the cardstock.


Fold to close


I put together 4 folded pages of scrap paper

and  used a needle and thread to stitch

a signature for the book.


Start center inside to outside

a then back again-

tie a knot on the inside.


See the stitches on the spine?


Here is a mini in front of a full size

Junk Journal that I made.


I think I'm going to put it with this journal !


They would be darling little ornaments or gift tags!


All of these were made with scraps!

I have loved and collected

 Little Golden Books for years.

I only repurpose books that are beyond repair

 or purchased for a specific purpose.

I pick them up when I go thrifting...

it's hard for me to leave them behind.

Thanks for visiting today.

xo Lisa S


In the comments let me know your favorite

Little Golden Book.

We loved The Poky Little Puppy !


Vintage Scotch Tape TINS -

  Make great Candle Coasters ! Merry Christmas ! Some mischief-makers have had a hold on my computer...??? Unfortunately it wasn't these...