Hello my Friends,
Do you get a lot of junk mail ?
Sometimes I look through it and think,
''What can I make with that?"
Some cool bits of cardstock and sometimes
fun colors and textures-
This week it was envelopes with windows,
I decided to cover them with pretty paper.
First, I cut 3 sides of the envelope- top and both sides.
So it will opened it up.
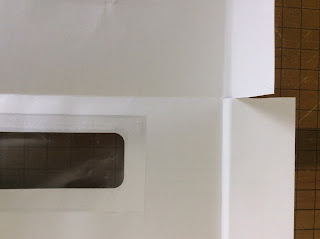
Fold your top flap piece down about 1 1/2''
then another fold line 1/4'' under the first fold.
Open the envelope and cut down the center fold line
to the second flap fold line.
Glue down the flap on inside window side.
Measure your paper, mine was 8'' wide.
Fold in half, slip your envelope inside to mark the window.
Run a pencil or bone folder along the inside of the window.
It will leave an indentation in the paper.
I went over the mark with pencil so you could see.
Use a utility blade to x-out the window.
You can use tiny scissors to cut open the window.
You can use Distress Ink on paper edges.
Then you can glue down the front over the window.
Next choose what you would like to see through the window
and glue to the inside of the back.
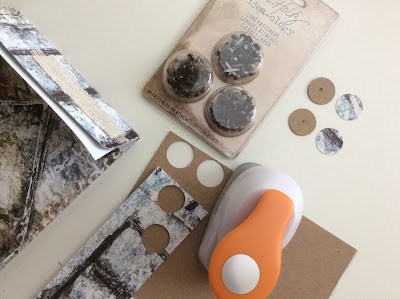
Make a closure with tiny brads or eyelets.
I cut 1 1/2'' circles with cardboard and covered with
decorative paper.
Poke a hole in center and attach to your folder.
Glue a scrape piece on flap
and cover the back of the brad,
glue down and score and fold your flap again.
I used a 2'' circle to cut a half circle
finger pull.
Cut a 12'' piece of string.
I used embroidery floss.
Tie around top closure and knot.
On the other end I added a bead,
That's it-
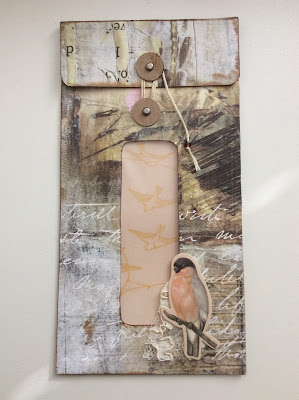
Here are some of the folders I made.
This envelope had a large window.
This is the back -
This is the front-
And this is the back-
I'm so glad we could spend some quiet time together!
I hope I didn't confuse you with too many details.
Thanks!
xo Lisa S


What a great idea!! I love it. :-)
ReplyDeleteThanks Lynda!
Deletexo Lisa S
Did you stencil, stamp, watercolor to get the beautiful designs/colors on the outsides or what? Soooo pretty.
DeleteI used old magazines, art from books, mail flyers, scrapbook paper.... anything that I have saved and filed away.
DeleteThank you!
This so creative.
ReplyDeleteRebecca,
DeleteThanks! You are sweet.
xo Lisa S
I love using what's supposed to be thrown away in my artwork! Just today, I made a card with a portion of a Kleenex box! Your projects are wonderful! I love the world of upcycling. I'm glad you do too! Smiles, Linda at Paper Seedlings
ReplyDeleteLinda, I love everything you make ;)
DeleteIt is a special feeling of accomplishment when we can make something from an other wise discarded item. Free is my favorite word....well one of them!
xo Lisa S
A great upcycle and super artsy.
ReplyDeleteThank you Thank you!
DeleteYou are SO artsy...I'll treasure that comment :)
xo Lisa S
This is so clever! I love it!
ReplyDeleteJennifer'
DeleteNice of you to say!
I hope you are having a wonderful week!
xo Lisa S
Surprisingly beautiful!
ReplyDeleteMichele
DeleteThank you! My neighbor saw what I was making and she brought more
envelopes over. I appreciated the thought but had to say NO more:)
xo ;) Lisa S
These are beautiful Lisa - they look just like the ones I used to buy in the stores! CONGRATS - you are our Friend of the Week at Friendship Friday at Create With Joy! :-)
ReplyDeleteOh you are so sweet! Thank you so much.
Deletexo Lisa S
What a beautiful use of what we would otherwise consider "junk"!
ReplyDeleteDonna,
DeleteThank you so much!
xo Lisa S
Oh these are just lovely. And what do you end up doing with them?
ReplyDeleteI used one for my thrift store cash allotment.....to keep myself from spending to much in theory. Gave 2 away with flower seed request. The last one is empty for now, maybe I'll tuck it into a journal.
Deletexo Lisa S
So creative! Thanks for sharing on Happiness is Homemade!
ReplyDeleteThank you so much for hosting and stopping by!
Deletexo Lisa S
What a fun, fun idea! I'm going to feature this at our Party in Your PJs link party tomorrow night on my Grandma Ideas site. Thanks so much for sharing this wonderful idea!
ReplyDeleteThanks Nina! I appreciate all you hosting each week.
DeleteI am honored to be in the feature.
xo Lisa S
These are lovely. I've been making some gift bags with similar fastenings myself this week, they are fun aren't they and surprisingly easy!
ReplyDeleteThanks Julie!
DeleteI look forward to seeing your gift bags. What a great idea to make them reusable. I just love this type of closure :)
You are so sweet to stop by- Thank you for hosting each week.
I don't know how you get so much done!
xo Lisa S
Another great idea! Look like you can use these to clip and transport your coupons. Thanks for sharing on my What Are You Doing? Social hop!
ReplyDeleteSara,
DeleteThank you so much! It's nice to meet you. Thank you for hosting.
I will be adding your party to my blog hop page :)
xo Lisa S
This is such a cool idea. Thank you for sharing on the Classy Flamingos party. You've been PINKED!
ReplyDeleteThank you Linda!!!!!!
DeleteYou are so sweet.
xo Lisa S
This is so creative. They are so cute and useful. Thank you for sharing at #omhgww. See you next week!
ReplyDelete#omhgww, #aclwcc, #party, #linkup
You are very kind to say so !
DeleteThank you for hosting each week.
xo Lisa S
Brilliant Lisa! My mom gets a TON of junk mail so now I have options!
ReplyDeleteCarol,
DeleteThank you! Once in a while I find nice cardstock to reuse.
It's fun to think about options.
HAVE A GREAT WEEK!
xo Lisa S
This is a interesting idea and very pretty. Thanks for taking the time to share it. #HomeMattersParty
ReplyDeleteThank you Donna!
DeleteIt's so nice to have you visit.
xo Lisa S
Lisa, this is such a cute idea, and a perfect way to recycle. You are being featured at the Friday with Friends link party!
ReplyDeleteThank you so much. I appreciate you so much.
Deletexo Lisa S