Monday, January 7, 2019

Easy Valentine Gift Bag Banner

Welcome Friends,

Well the Christmas décor is put away and the house looks empty and void of color.

The  WINTER WHITE  theme lasted 1 week :) !  I know it's too early..... and I am
 
 sooooo....sorry ... but I am going to share a Valentines' project today.

Skip it for now and come back later if you want to, but I'd love to have you stay!


You will only need 1 set of 3 bags-

These came from the Dollar Tree and they had other choices

Scissors, hole punch, pencil and glue

and some ribbon.

I used Bakers Twine from the Dollar Tree.....

so this banner will cost...... $1.00
 
 
Cut down the sides at the fold line
 
then across the bottom to make two pieces.
 
This step is hard to see in this picture. 


Aren't these bags cute ? 


Cut off bottom flap


Cut a Dove Tail at base.


 Maybe this picture is better!


Cut bag into two pieces, cutting on the fold line.


Gently remove handles. 
 
Glue the flaps down with a glue stick or Tacky Glue.


The fronts will look like this.

 
Punch holes at top on both sides
 
Measure the about of ribbon or jute twine you will need- I used 1 1/2 yds.

 
Here is a look at the back side. 


Lay out your paper in the order you would like them to hang.
 
String together.


Once the banner is hanging, you can change the spacing.


If you like this project, you might like to see the
 
 Doily Wreath here.


Adding a little bit of color made me happy!
 
After I hung the banner it started to rain outside...so I decided
 
to sit and enjoy a fire.
 
I am so grateful that you stopped by-
 
xo Lisa S


Tuesday, January 1, 2019

Top 10 MOST VIEWED 2018

First I would like to THANK YOU for taking the time to visit my site.

I truly appreciate each and everyone of you. I love your comments

and your encouraging words!

I have only been blogging for a very short time and as you can probably tell

I really don't know what I am doing....but I am having  a lot of fun.

As we start a new year I thought I would look back

 at my most viewed posts.


 This is the first year I joined with other bloggers at ''linky'' parties- or Blog Hops.

I have set up a page so you see and join in-

I have meet the most wonderful people here and I appreciate the  hard work

 involved in hosting these parties.

If you are new here- these are some of the projects that I shared. If you have

been here before and seen all of these, I invite you to hang around and look through

other projects listed.


Top 10 Most Viewed 2018


Chalk painting a Vintage Suitcase


How to Paint Pastel Gingham/ Buffalo Check Plaid


Kitchenware as Repurposed Planters


I hope this next year will be filled with love, God's grace and good health to you!
 
xo Lisa S


Sunday, December 30, 2018

How to make an Altered Book Planner-Calendar

 
Happy New Year !
 
 I don't know about you but I still like to use a hand held Planner-Calendar.
 
One that I can write notes to myself, check over appointments,
 
do menu planning, write down shopping lists,
 
a bit of doodling and a general to-do list.
 
I don't always take the time to add things to the calendar on my cell phone.
 
I have been on vacation from work for 2 weeks....
 
everyday my phone told me I was late for work because I didn't change
 
my calendar on my phone !  :)


So I thought I would share with you this altered book version-


 You will need a planner. I found mine at Dollar Tree.
 
A book approx. the same size and thickness as the planner.
 
A sheet of cardstock
 
A utility knife
 
Tacky Glue
 
and an optional scrap of ribbon
 
scissors
 
a straight edge ruler
 
and a pencil


 This is my planner from Dollar Tree.
 
I removed the plastic pocket sleeve.


 It had a heavy cardboard cover.


 An old math primer I had on hand was just the right size.


This is the cardstock I used. 


 I used a utility knife to remove the pages.
 
 Be careful not to cut all the way through.


 Your book will look like this.


 Laying out flat to show the outside cover
 
and the inside.


Cover the inside spine area with paper . Approx. 2'' wide and the length of the book.
 
Optional bookmark ribbon can be added here.


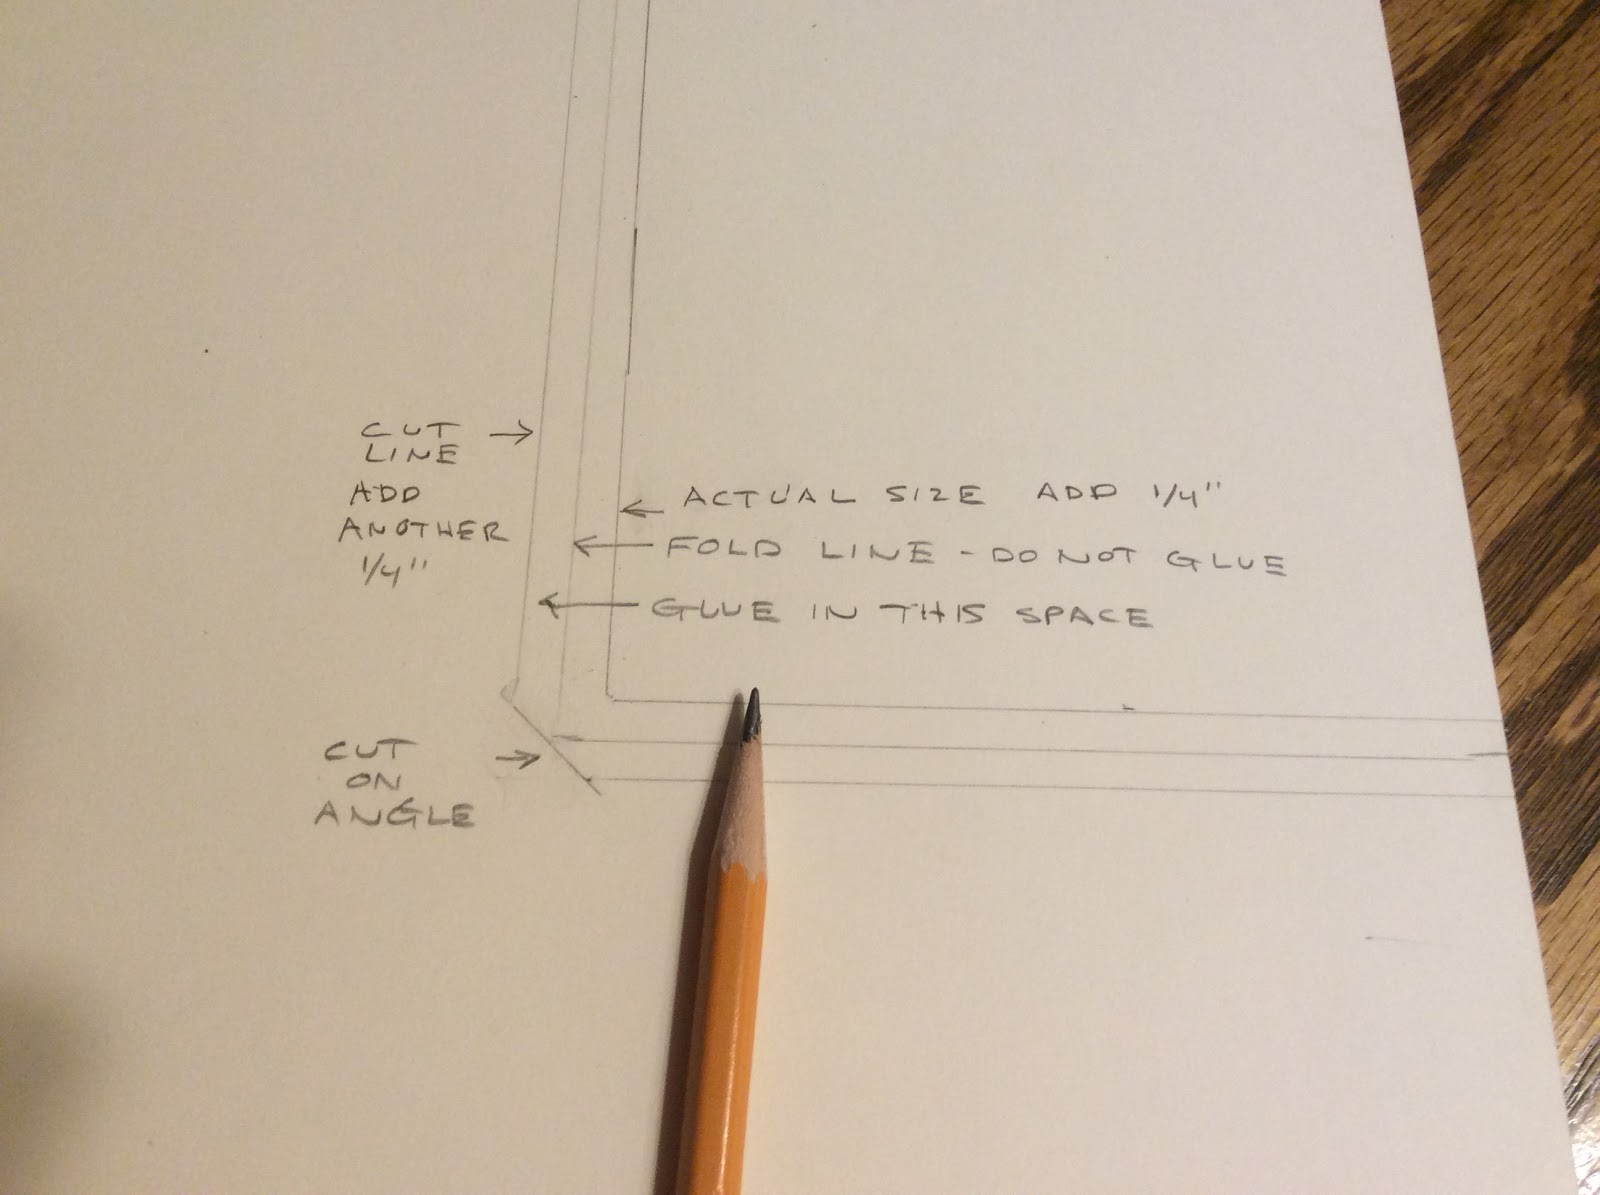
Measure your cardstock.
 
 
Add 1/4'' to actual size needed. Then add another 1/4'' for your cut line.
 
Use a straight edge up against your line to make your fold.
 
 
You are making a pocket for your planner. Do not glue down the fold!
 
You are gluing the outside of the fold to your book.


Let dry,
 
slip planner into pocket
 
 
 Fold cover back to make this easier.


Tuck and glue a scrap of ribbon into the top, for a bookmark


 The cover can be used the following year by just removing the old
 
planner and replacing with another.


Just mixed in with other books on the desk. 


 Thank you for letting me share my planner with you !
 
Let me know, have you gone paperless?
 
Do you like to keep a calendar ?
 
xo Lisa S


Tuesday, December 18, 2018

Vintage NATIVITY and ANGEL Postcard Printables

 
Merry Christmas! 


I love Christmas Carols and I thought I would leave you with this,
 
It is one of my favorites. It can be read as a poem.
 

 O come all ye faithful
Joyful and triumphant
O come ye o come ye
To Bethlehem
Come and behold Him
Born the King of angels

O come let us adore Him
O come let us adore him
O come let us adore Him
Christ the Lord


Oh come, all ye faithful
Come let us adore Him
Oh come, all ye faithful
Come let us adore Him


Sing choirs of angels
Sing in exultation
Sing all ye citizens
Of heaven above
Glory to God
All glory in the highest

O come let us adore Him
O come let us adore him
O come let us adore Him

 Christ the Lord


Blessings to you and your family.
May you share a joy filled Christmas with those you love.
xo Lisa S


How to make Grubby Candles

  Hello my friend! It looks like a mess, but I promise it's not that bad. I'm going to show you how I made  some grubby candles usin...